Posh Pixels Design Studio having a giveaway of Bakerella's Cake Pops book and a cake pop kit. Go to Posh Pixels site and enter to win. There are seven different ways to enter, the more you enter the more chances you have to win.
Click the link above to go directly to the giveaway! You have until Thursday, September 23, 2010 before 11:00pm (EST) to enter. Good luck!
Wednesday, September 22, 2010
Monday, September 20, 2010
My Little Rascal...
I'm talking about my two year old toddler who sometimes thinks he's five. Today on my Facebook status I wrote:
"Micah's highlights today: "stealing" those round size tag things from hangers while at Ross (found a bunch in his carseat cup holder), walking in the grocery parking lot & he decides to stomp his foot into a puddle splashing really dirty water all over my foot (I was wearing slippahs), & lastly his nightly fart in my face while I get him changed after his bath. The end!"
While browsing through Ross he picked up all the size tags on the floor and hit them in his jeans pockets. When we left to go to another destination and I took him out of his carseat, I found his little handful of tags in his carseat cup holder.
Yesterday it rained cats and dogs and Micah stepped in puddles which I didn't really mind too much since I wore boots. Today it was a little sunnier so I wore slippahs when we ran errands but Micah wore some sneakers. We were walking towards the entrance to the grocery store and a puddle was in our path. I steered him away from the puddle but he stuck his foot out and stomped right into it. Dark dirty water all over my foot!
Living in a house with all males and that also includes our Maltese dog, I am surrounded with male bodily function humor. It was only fitting that Micah would soon pick up that male humor. He thinks its hilarious to fart and especially after I bath him. He will tell me, "Mama I futt in yo hand mama! Ha ha!" If it doesn't come out naturally, this kid will force it out. His favorite time to surprise me with one is when I remove his bath towel and he blasts one straight at me.
With all the little rascal boy things he does I can't help but smile and laugh. He's my one and only "Lil Booger" as I call him, his smile and dimples just melt me to pieces.
Saturday, September 18, 2010
I Think I'm In Love w/Anastacia...
The Hollywood eyebrow guru that is...LOL! A few months ago I went to Sephora on the hunt for the Anastacia Eyebrow Kit but I wasn't about to buy it for $100+ with all the extra goodies in it. All I wanted and needed were the eyebrow stencils and for $20 it was a dun deal. I had read somewhere that these stencils worked really well in shaping your eyebrows and Lord knows I needed that help. Since I no longer go to a professional waxer to cut costs in this darn economy I've succumbed to waxing and tweezing my own eyebrows again.
I admit I can go weeks without maintaining them and I end up losing the shape so I end up over plucking or not plucking in the right spots. Weird as it may sound I tend to check out people's eyebrows so see how they're shaped and I really envy those who have perfectly groomed and shaped eyebrows. I've even considered tattooing my eyebrows but I'm too chicken and afraid of it looking so fake, even worse it's permanent.
So anyway I bought the Anastacia Eyebrow Stencils a few months back and tried them. Guess I didn't try hard enough since I couldn't figure out to get the shape correctly so I gave up. Now fast foward about seven months later and I gave it another try. By golly I think it finally worked! Granted I may have again over plucked a little and the ends my of eyebrows are a little sparse to begin with, but with some eyebrow filler (I use the Laura Mercier Brow Definer) everything looks nice and tidy. I just did this tonight without putting on my full blown makeup battle gear on so things could be a little different when I try to recreate the shape at a later time.
So as of right now I am saying I think I'm on love with Anastacia for helping me re-shape my eyebrows. If there's another post about this then you'll know something went wrong.
Thursday, September 16, 2010
These Boots Were Made For Walking....
I finally found a pair of slouch style boots that actually fit the contours of my FLAT FEET! Last fall I saw a pair of Steve Madden flat heeled knee high slouch boots but never got them. I should have since they were on sale and the store still had a pair in my size. I would normally see it as sign that something was meant just for me if it was the last one in my size, but I passed them up. So since then I've been dwelling over that loss and with fall and winter approaching I was on a hunt for a pair of boots.
Last week I went to Ross just to get what I needed and I decided to stop into Famous Footwear next door just to "browse". Yeah, that didn't happen since I found a pair of Madden Girl boots. It was something I was looking for but this pair was a little different. It actually had a 3-inch heel and buckles, something I wasn't really going for but I tried in on anyway. What do you know, they fit really great! I wanted a flat heel since my flat feet can no longer handle heels much anymore but this pair fit just right and didn't hug around my calves tightly. I fell in LOVE!
The store had a buy one, get one half off sale so I decided to get a pair of kicks my little one since there wasn't anything else that I liked. The final damage was $85, pretty steep but I was super happy that I found boots. I was so excited that I found the pair of boots that I was ready to blog about them until I searched them online to only find them CHEAPER elsewhere! UGH!!!
I ended up finding the same exact pair the Madden Girl Partial online at DSW for $20 cheaper! They had a Labor Day weekend sale and if I signed up for their free rewards program I'd get free shipping. So what did I do? I returned BOTH pairs of shoes back to Famous Footwear and I did ask if they did price matching and they said no, humph. Then I ordered the cheaper pair online from DSW and waited just a week for them and now I'm happy as a clam.
I wore them out today even it was a short trip to the grocery store ha ha, but they are so comfy and I really love them. Here are what they look like alone, I have yet to take a pic with them on.

Becoming a Bridal Shower "Cake"...
I've only made one bridal shower "cake" before and that was three years ago for my friend Suelynne. It was simply decorated with ribbon and fake flower hydrangeas. The cake which was made out of two bath towels, two hand towels, and two washcloths turned out really pretty, so pretty that till this day Suelynne has never taken it apart. In fact it's still on the poster board with the crinkled stuffing at the bottom tier same as the day I presented it to her. Here is what that towel cake looked like.


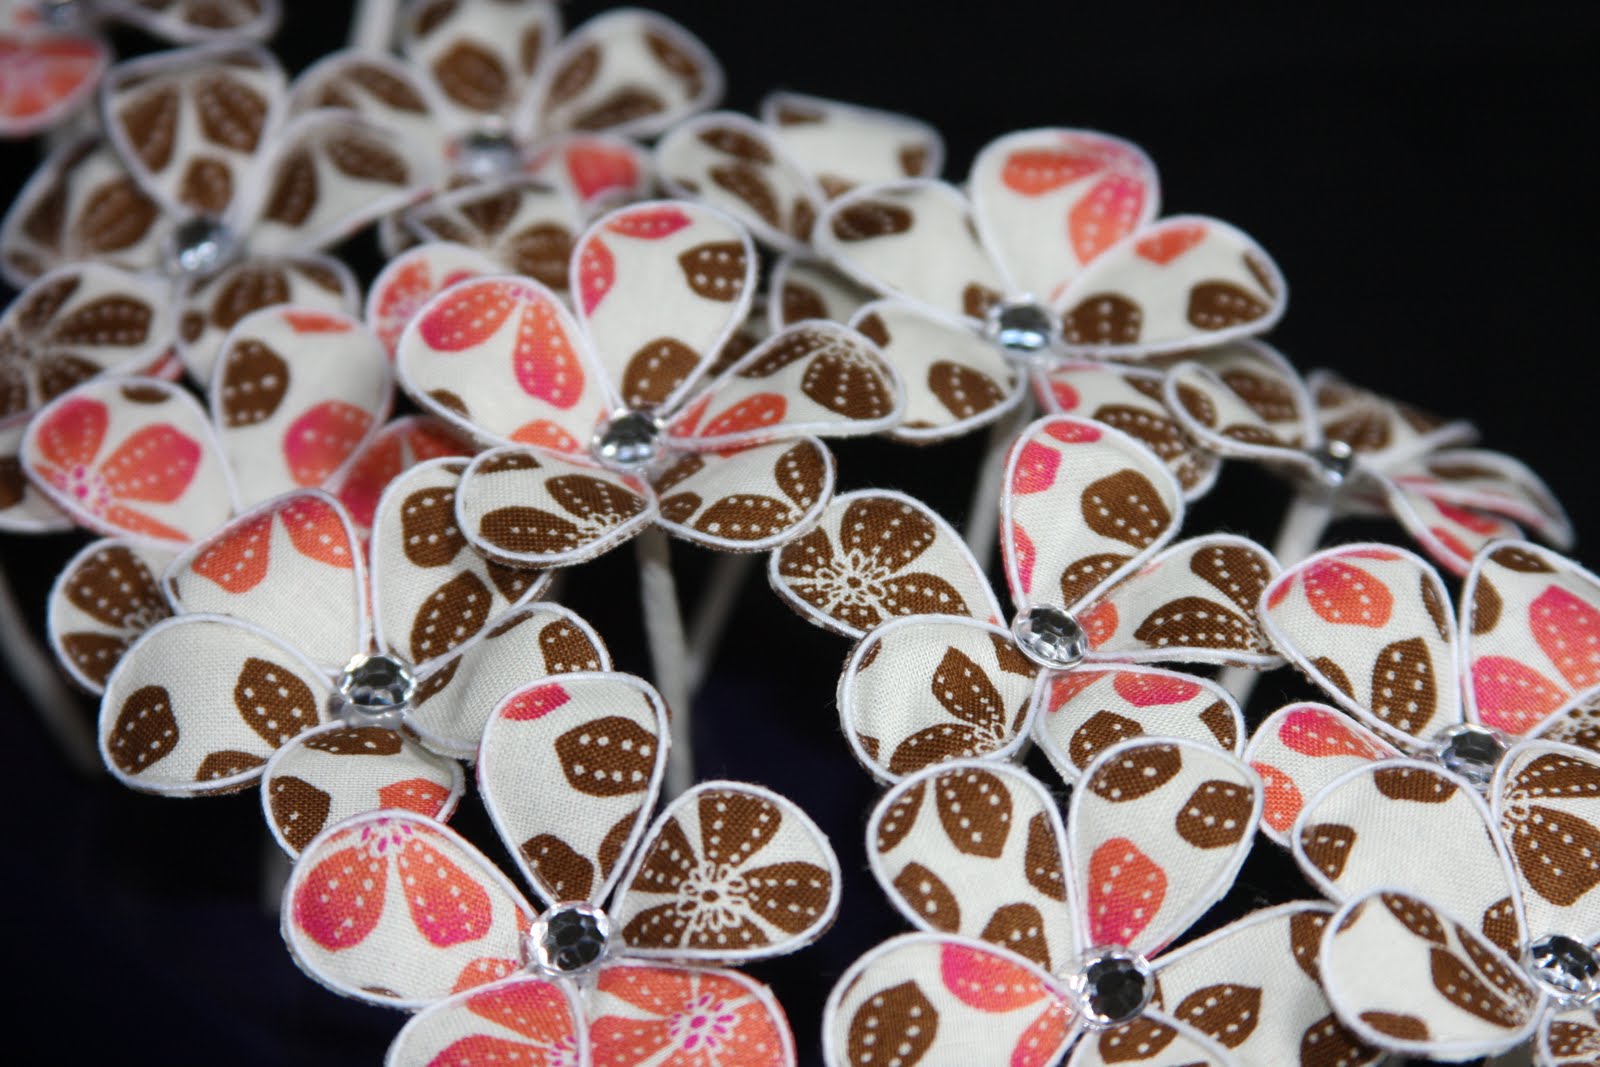
Fast forward nearly three years later and I have another opportunity to make a bridal shower towel cake. Only this time I wanted to do something a little different and try my hand in making homemade fabric flowers. Our friends Jenna and Wilson are getting married in Oahu next February so it only made sense for me to decorate the towel cake with plumeria flours.
My friend MJ and I had a conversation one day about fabric flowers and asked if I knew how to make them. I told her I didn't so I went to the world of Google and found an easy tutorial that can be found on the blog Polka Dot Pineapple. With the bridal shower coming up I bought all the supplies I needed to create these flowers especially in Jenna and Wilson's wedding color scheme which are espresso, coral, and ivory (which was hard to find but I totally lucked out).
I had to individually make each petal and five petals made one plumeria. I ended up making about 30 plumerias total so you do the math on how many petals I created. It was time consuming but really easy to make. This is a great way to use up scraps of material that you may have been hoarding. Here are a few pictures of the flower making (sorry I don't have pics of each step) and the end result of Jenna and Wilson's shower cake.
The beginning of 150 petals...

Full concentration to get glue and a very thin piece of wire.

I have a yard of material to make a really BIG field of plumerias.

Completed plumerias.

Added some bling to girlyfy them.
The complete bridal shower towel cake.

My favorite pic of the top tier and I was only playing around with the camera.

Just For Sarah...
As my onesie cupcake gifts are getting better with improvements they have become my go to gift for baby showers if they're being sent out of state. This particular gift was sent to my husband's aunt on Oahu for baby Sarah. Sarah is part Japanese so it was only fitting that I made special onesies with Asian printed material cut from my Cricut Expression. I had gotten the "Pagoda" cartridge last Christmas and it has cherry blossom designs which were perfect for Sarah since it is her room decor theme. Here are the appliques on the onesies and how they looked after being turned into a "basketful of treats."


"Pagoda & Accent Essentials" Cricut Cartridges

Basketful of Treats

Wednesday, September 15, 2010
September 2010 Meal #4: Baked Rataouille
For Meal #4 I also referred to the cookbook "Taste of Home: Best Loved Casseroles" and chose to make Baked Ratatouille. Just seeing the word "ratatouille" reminds me of the children's cartoon movie of the same name. If you have seen the movie you would recall it's a layered dish consisting of eggplant and some other vegetables. This recipe called for layering of the veggies however my meal didn't quite turn out exactly how its supposed too.
The night I made this for dinner is the same night my husband plays for his flag football league. I had to cook this before I had to pick him up from work to head out to the game. I ended up just cubing and mixing all the ingredients together in a pot instead of it being a casserole and I neglected to read the ingredients correctly since I was missing cheese for the topping. So unfortunately I don't have a picture to share although it turned out really good over a bed of hot rice anyway ;p
BAKED RATATOUILLE
Ingredients:
4 bacon strips, cut into 2-inch pieces (I omitted the bacon and used ground Italian sausage, cook til no longer pink)
1 cup onion, sliced
1 can (14 1/2 ounces) diced tomatoes, undrained
1/3 cup tomato paste
1/4 cup olive oil
1 large garlic clove, minced
1 tsp. salt
1 tsp. Italian seasoning
1 large eggplant (about 1 1/4 lbs.), peeled and cubed
4 medium zucchini, sliced
1 large green pepper, cut into strips
8-12 ounces sliced Monterey Jack cheese
Directions:
In a large skillet, cook the bacon (or ground Italian sausage) and onion over medium heat until bacon is crisp (or until sausage is brown); drain oil. Stir in the tomatoes, tomato paste, oil, garlic, salt, and Italian seasoning.
Spread half into a greased 13-in x 9-in. x 2-in. baking dish. Layer with half of eggplant, zucchini, green pepper, and cheese. Repeat layers. Bake uncovered at 375 degrees for 50-55 minutes or until hot and bubbly.
September 2010 Meal #3: Enchilada Casserole
I mentioned before that I used to have a habit of buying those little cookbooks that you see at the checkout counter at the grocery store. I have begun to utilize them and there are pretty good recipes in there. Out of the recipe book "Taste of Home: Best Loved Casseroles" for Meal #3 I chose the Enchilada Casserole. It was really easy to make and didn't take much time. The outcome was really tasty however I would make more filling since the edges were kind of dry after I baked it. I'll have to remember to make a few revisions to his dish the next time I decide to make it. Here's a picture sample and recipe to share. I only wished I had some sour cream to complete my dinner.
ENCHILADA CASSEROLE
Ingredients:
1 lb. hamburger or ground turkey
1-1/2 cups onions, chopped
2 garlic cloves, minced
1 tbsp. plus 1/3 cup vegetable oil, divided
1/3 cup all-purpose flour
2 tbsp. chili powder
3/4 tsp. seasoned salt
1/8 tsp. pepper
4 cups water
12 corn tortillas (7 inches)
1-1/2 cups (6 ounces) shredded cheddar cheese
1-1/2 cup salsa
Directions:
In a large skillet over medium heat, cook meat, onions, and garlic in 1 tbsp. oil until no longer pink; drain. Sprinkle with the flour, chili powder, seasoned salt, and pepper. Add water; bring to a boil. Reduce heat; simmer uncovered, for 8-10 minutes or until reduced.
In another skillet, fry tortillas in remaining oil for about 15 seconds turning once. Drain well. Cut nine tortillas in half. Place cut edge of one tortilla against each short end of a greased 11-in. x 7-in. x 2-in. baking dish. Place cut edge of two tortillas against long sides of dish, overlapping to fit. Place a whole tortilla in center.
Spoon 2 cups of meat mixture over tortillas; sprinkle with 1/2 cup cheese. Repeat layers. Top with remaining tortillas and meat sauce. Bake uncovered at 375 degrees for 20 minutes. Sprinkle with remaining cheese. Bake 5-10 minutes longer or until cheese is melted. Serve with salsa.

Tuesday, September 14, 2010
September 2010 Meal #2: Mushroom Risotto w/Sweet Italian Sausage
I have been looking forward to making this meal for the past two months and I finally have done so. Meal #2 was Mushroom Risotto w/Sweet Italian Sausage. The sausage I got from a vendor Jacobsmuhlens at our local Saturday Farmer's Market and they have several different varieties of sausages and meats including buffalo.
Ever since our honeymoon three years ago to Italy, I fell in love with eating risotto. I always feared in making it myself since I heard it was "complicated" to make, the rice will turn into mush or it will be undercooked. So anytime I'd see risotto on the menu when eating out I'd always choose that for my meal. Upon starting this blog about my menu planning I finally decided to try my hand in making homemade risotto. I asked around a bunch of my friends on a mommy site to recommend a recipe and Andrea referred me to allrecipes.com and gave me a recipe for Gourmet Mushroom Risotto. It looked simple enough and since it had mushrooms (my faves) there could be no wrong. I could even change up the measurements since the six servings listed wasn't enough for my "normal" cooking amounts.
I followed the recipe to the "T' and it was actually really easy. I heated up sliced sweet Italian sausage in a frying pan and added it to the risotto. The outcome turned out really yummy, so much that I want to make it again later this week and a regular side dish to our meals. Here's the recipe and a picture to share.
MUSHROOM RISOTTO w/SWEET ITALIAN SAUSAGE
Ingredients:
6 cups chicken broth, divided
3 tablespoons olive oil, divided
1 pound portobello mushrooms, thinly sliced
1 pound white mushrooms, thinly sliced
2 shallots, diced
1 1/2 cups Arborio rice
1/2 cup dry white wine
sea salt to taste
freshly ground black pepper to taste
3 tablespoons finely chopped chives
4 tablespoons butter
1/3 cup freshly grated Parmesan cheese
Directions:
1.In a saucepan, warm the broth over low heat.
2.Warm 2 tablespoons olive oil in a large saucepan over medium-high heat. Stir in the mushrooms, and cook until soft, about 3 minutes. Remove mushrooms and their liquid, and set aside.
3.Add 1 tablespoon olive oil to skillet, and stir in the shallots. Cook 1 minute. Add rice, stirring to coat with oil, about 2 minutes. When the rice has taken on a pale, golden color, pour in wine, stirring constantly until the wine is fully absorbed. Add 1/2 cup broth to the rice, and stir until the broth is absorbed. Continue adding broth 1/2 cup at a time, stirring continuously, until the liquid is absorbed and the rice is al dente, about 15 to 20 minutes.
4.Remove from heat, and stir in mushrooms with their liquid, butter, chives, and parmesan. Season with salt and pepper to taste.

Tuesday, September 7, 2010
September 2010 Meal #1: Baked Chicken w/Gravy
I'm finally posting about September Meal #1 and I finally got to make it for dinner last night. Last night's dinner was Baked Chicken w/Gravy and it was pretty much prepared the same way I made Baked Chicken w/Cream of Mushroom Gravy the other month. The only difference is that I made packaged chicken gravy instead of condensed cream of mushroom soup. It pretty much tastes the same and my lil one liked it a lot since he ate a bowlful of it. So to refer to the recipe just click the link above to see how I prepared it and here's a picture on what last night's dinner looked like.


Sunday, September 5, 2010
My Momma Say Fool's Ball For the Debbo....
I jokingly use that phrase from the movie "Waterboy" when I'm talking football with my husband and friends ha ha. My husband knows that I am only kidding everytime I say that and also another movie line from "Remember the Titans" when the head coach's daughter says to the other coach's daughter "Cheryl, I don't care?" anytime he's talking football gibberish to me. All in all I do enjoy the sport even though I may not understand it fully.
My husband has been involved with football all year whether it was coaching or playing football. For the past year he has been coaching youth football for Westview Youth and for a semi-pro team called the "Portland Monarchs." In between that he also played for a winter flag football team called "Back That Pass Up" and now for the City of Hillsboro flag football league "Sudden Rush". It's year round football in this house and I'm just happy my husband has a passion for the sport and does a good job playing and coaching. Here's a picture of his current team Sudden Rush.

My husband has been involved with football all year whether it was coaching or playing football. For the past year he has been coaching youth football for Westview Youth and for a semi-pro team called the "Portland Monarchs." In between that he also played for a winter flag football team called "Back That Pass Up" and now for the City of Hillsboro flag football league "Sudden Rush". It's year round football in this house and I'm just happy my husband has a passion for the sport and does a good job playing and coaching. Here's a picture of his current team Sudden Rush.

Kim Chee Fried Rice
It's been a busy week full of get togethers and I haven't been able to start on September's menu plan yet. We hosted the UH vs. USC football game there was a lot of FOOD. There was enough for us to eat at leftovers the next day and I also had a rotisserie chicken that I got from Costco still in the fridge since we never made it to a friend's get together. During this time I had thought I had defrosted some pork steaks and was going to cook it tonight before it spoiled, but I mistook the tray of meat in the fridge for ours when it actually was my BIL's. So with no meat defrosted we had no dinner tonight until I realized that I had some kim chee that I've been hoarding to make Kim Chee Fried Rice.
For some reason I've been craving it and I've actually never ate it before. So tonight was the perfect time to make it and something to whip up easily. After it was all made, this turned out super yummy and I don't know I've never made this before either. I just used Spam, onions, garlic, eggs, and cut up kim chee, I think I'll add different kinds of meats now that I've developed a craving for lup cheong now. Here's how it turned out and the recipe to boot too.
KIM CHEE FRIED RICE
Ingredients:
1 can Spam, cubed
2 tbsp. garlic, minced
1/2 onion, diced
1 jar kim chee, chopped up (reserve liquid)
8 eggs, scrambled
4 cup rice, cooked
oil
Directions:
Fry Spam, garlic, and onions in oil till Spam is lightly brown and onions are tender. Add eggs and scramble into mixture (add more oil if pan isn't coated enough). Add kim chee and mix. Add rice and kim chee liquid and thoroughly mix.
Enjoy!

Hubby Shot Some People....
An engagement photoshoot that is. He shot the engagement pictures of one of his co-workers who is getting married in my hometown Maui next month. He hasn't done any photoshoots as of lates and he did really well. Here are some of the ones that I like.


Saturday, September 4, 2010
I Think I Got It....
My second try at making those onesie cupcakes turned out cute but I thought they still needed improvement. I wasn't particularly happy with the shape of the cupcake after I covered it with the baby washcloth. Then I had an idea when I had another baby gift to send home to Hawaii, I figured that I should use quilt batting to help give it some shape. Voila, below is the result of what quilt batting did to improve it for the better. Think I got perfected now.


Iron On Appliques

Don't they look much better?

Off to Oahu, Hawaii they went.

Second Attempt...
This was my second time making onesie cupcakes and since I was going to attempt to make baby washcloth lolliops, I had the bright idea of using some of the washcloths to cover the tops of the onesies. For the onesies though, instead of embellishing them with the store bought iron on appliques I made my own fabric appliques from my Cricut Expression.
Making the washcloth lollipops was my first time, I found a pack of 12 baby girl themed washcloth at a retail department store. I actually used lollipop sticks since I had a bunch on hand leftover from my previous failed attempt to make cookie lollipops but that's for another story. Here are the creations that went to our good friends in Las Vegas.


Making the washcloth lollipops was my first time, I found a pack of 12 baby girl themed washcloth at a retail department store. I actually used lollipop sticks since I had a bunch on hand leftover from my previous failed attempt to make cookie lollipops but that's for another story. Here are the creations that went to our good friends in Las Vegas.
Onesie's w/fabric appliques cut from the Cricut Expression

Washcloth Lollipops

Basketful of "Treats"

My First Onesie Cupcakes...
A long while ago I was Internet researching on different baby gift items to create on your own. One of the cute and easy gifts I found were onesie cupcakes. They were just plain colored baby onesies rolled up decorated with little embellishments and stuck into a muffin paper cup thing. They looked simple enough to make and I figured I could do that myself.
Since I had a baby shower coming up, the mother and father had a very special and specific request on what color clothing they preferred for their baby. They had a "Nightmare Before Christmas" theme and that was out of the normal baby theme. I found it as a challenge with open arms to create something as close to that theme as possible.
Thus this was created and an evolution of onesie cupcake gifts were created. I dyed some onesies and added cute iron on appliques to each of them, turned them into "cupcakes", and added little embellishments.
"That's How I Roll" & "eat, sleep, poop, cry"

"My Dad Rocks" & "My Mom Rocks"

"So Fresh & So Clean", "Born to Rock", & "AB/CD"

Cupcake Creation
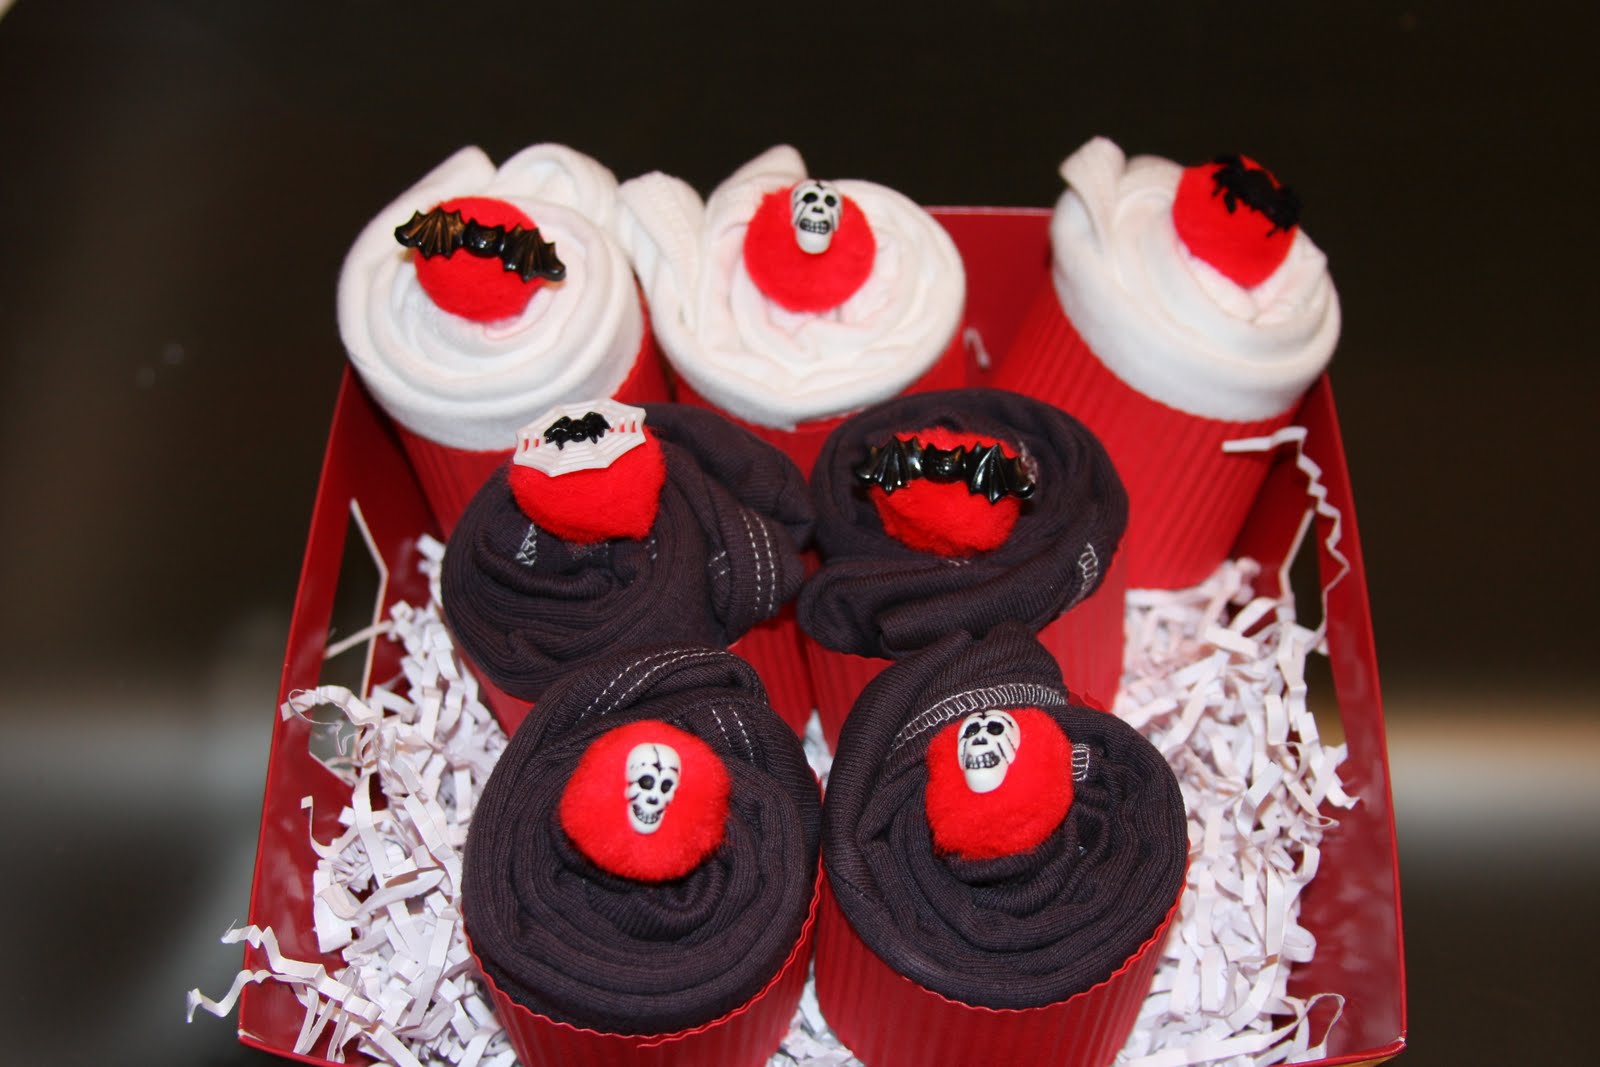
All Packaged & Ready to go

Friday, September 3, 2010
Plush Kid's Neck Pillow
In addition to my sister's request for a makeup bag, she also asked me if I could sew up a kid's neck pillow for my nephew. She was planning on buying one but those suckers are kind of expensive, so she figured that I could probably make one. So I did my search on the Internet to find a tutorial on how to make one. I pretty much knew it'd be just like sewing a pillow and stuffing it, but I figure I just check and see if there was any specific way on to make one.
Lo and behold I found quite a lot of tutorials, even better I found one that had a pattern at the craft site Ucreate. SWEET!! I can't draw to save my life so having a pattern helped me cut the fabric as even as possible. Since my sister lives in Hawaii I tried to find material that would be soft, comfortable, and wouldn't feel irritating against my nephew's skin on days he uses the neck pillow during hot/humid weather. I found a soft plush material with zoo animals on it and the bonus was that it was on sale AND I had a coupon for extra off. I bought a yard of it since I figured I'd make one for my son too and I could also make a practice one as well.
For the first pillow I made I cut it exactly to the pattern I had and discovered while stitching it up that the material is so soft that I had a hard time trying to keep the seams together. Perhaps I needed to change the needle or whatever since I just use the standard needle. Nonetheless, I got it stitched up and ready to be stuffed. I used ultra plush stuffing to make it nice, soft, and comfy. The last procedure was to whip stitch that bugger up which I loathe and could never get right....well maybe never learned how to do it properly before. So instead I just smooshed down opening and stitched it closed with my machine...yeah lazy I know ha ha.
The end result came out alright and needed a few adjustments. So for the pillow I made for my nephew I just added about half an inch extra material to help stitch it up better. This worked out perfectly since I didn't have problems with stitching up the seams this time. I wasn't particularly happy with the way I closed up the first pillow and decided to overcome my dislike for whip stitching. So I referred to a YouTube video and got cracking on closing that pillow up. What do you know? I think I mastered whip stitching ha ha! Pillow #2 turned out a lot better and here it is below.
PLUSH KID'S NECK PILLOW

Pleated Makeup Bag & Tissue Holder
My sister asked me to sew her up a makeup bag and I happily took on the challenge. To start off I sent her a few links of different websites on possible makeup bags that she could choose a style from. Luckily she chose one that was easy enough for me to follow and try out.
I first made one for myself at a trial run before I made one for my sister since I wanted to make her one with a nylon lining for easy cleanup. I didn't want to waste the remnant nylon I got from the fabric store since the piece wasn't that large. In addition to making the makeup bags, I also sewed up some tissue holders as well since it looked really simple and it compliments the bags too. I found both tutorials at the blogsite Skip to My Lou along with some other great crafting tutorials.
So here are my latest creations.
Cherry Blossom &Damask Print


Inside Lining

Tokidoki & Floral Print

Inside Lined w/Nylon

Thursday, September 2, 2010
My Sew Story...
I have to admit that I'm a novice seamstress and I am learning as I go through trial and error. The only formal training that I had for sewing was in my 8th grade sewing elective class. I remember I sewed a pillow (that's actually still at my parents house), a bean bag rabbit that I fondly remember my neighbor James named "Lucille", and a windsock. I haven't sewn anything since then and really had no desire to until about two years ago.
My son was born and I found it astonishing how much burp cloths I went through wiping up spit ups from that lil person. I ran out of burp cloths and was washing a load of his clothes like every other day in order to get a clean burp cloth. Then I had an idea that I could either sew/make my own burp cloths or go buy some new ones that were already pricey to begin with. So my hubby gave me permission to buy my first sewing machine ever and I haven't looked back since.
I bought a Singer 4166 when Costco had a coupon for it and I didn't even research it.

I just bought it because of the price, little did I know this particular machine was actually little advanced for the novice me. That didn't matter to me since I really LOVE my machine after making a few things since the day I bought it. Firing up the machine the very first time was like riding a bike (yeah to those who know me, I don't know how to ride a bike. we'll save that story for another time.) and my first burp cloth was born.
I made my son's burp cloths out of decorative fleece and towel material with hopes of having it absorb the spit up action my son does. It was so easy, just a few straight lines, and sewing up the closure. I made a whole bunch for him and my nephew who is five months younger than my son.
From my first sewing project I have created more things in the last two years and working my way up to more advanced creations. As I mentioned I am learning through trial and error, I have borrowed books from the library to help refresh my memory of basic sewing techniques, and the INTERNET is wonderful for finding tutorials especially YOUTUBE. I've sewn a few new things lately and I'll post about them along with their pictures if there are any.
So that's my sew story and I'm sticking to it.
September 2010 Meal Plan
So I've got the ball rolling with this month's menu plan since I pretty much slacked off for the month of August. There are quite a few new recipes that I've added and have never tried before, so here's to experimentation. I dusted off the cobwebs from some of the cookbooks I've collected over the years especially those little ones you find at the checkout stand at your supermarket. I had developed a habit of buying those in hopes of implementing them but I never did. So now that I've started this meal plan experiment I am going to try to put all those cookbooks to good use.
I rolled over whatever meals for August I had planned so that at least helped me not think up new dishes to make. So here's the menu plan for September and I hope to try to stick to as much as I can.
SEPTEMBER MENU PLAN
I rolled over whatever meals for August I had planned so that at least helped me not think up new dishes to make. So here's the menu plan for September and I hope to try to stick to as much as I can.
SEPTEMBER MENU PLAN
- Baked Chicken w/Gravy
- Mushroom Risotto w/Italian Sausage
- Baked Beef Enchilada
- Baked Ratatouille
- Chicken Masala w/Roti Chapati
- Baby Back Ribs
- Spaghetti Goulash
- Crab Supreme
- Chinese Roast Chicken
- Eggplant Sausage Casserole
- Quickie Salisbury Steak
- Shrimp Cabonara
- Chicken & Sausage Gumbo
- Beef Broccoli
- Roast Pork w/Gravy
- Shoyu/Sesame Ahi
- Miki
- Pot Roast w/Veggies in Crockpot
- Port & Balatong (Mung Beans)
- Shrimp Scampi
- Chicken Long Rice
- Beef Wellington
- Pinakbet
- Baked Salmon w/Crab Stuffing
- Oyster Chicken w/Noodles
- Taco Crescent Bake
- Lauya
- Paella w/Shrimp & Chicken
- Cold Ginger Chicken
- Pad Thai
August 2010 Meal #12: Thai Coconut Shrimp Replaced By Black Bean Garlic Shrimp
My Meal #12 was originally supposed to be Thai Coconut Shrimp but instead I replaced it to be Black Bean Garlic Shrimp. I unfortunately forgot what cookbook I had seen that dish in and gave up trying to find it in my mountain of cookbooks. So the next best and easiest thing to cook up that shrimp that I had was to use some black bean sauce.
I've actually never made this before but my husband has, so this couldn't be hard right? Well it wasn't, I actually used the same ingredients as I use in the Pork & Eggplant w/Black Bean Garlic Sauce recipe and just used shrimp. All in about 10 minutes dinner was done and it was very yummy too. Alas, I don't have a picture of this as well...yeah I know I know I'm slacking in that department but here's the super easy recipe.
BLACK BEAN GARLIC SHRIMP
Ingredients:
1 lb. shrimp (I had used the smallest sized raw shrimp, you can use any sized shrimp to your liking. You can either leave the shell on or devein and peel.)
3 tbsp. garlic, minced
2 tbsp. butter or margarine
5 tbsp. black bean sauce
2 tbsp. garlic chili sauce
Directions:
Melt garlic in pan. Add all ingredients and cook until shrimp is cooked (no longer black/gray in color).
August 2010 Meal #11: Szechwan Ribs w/Mongolian Marinade
For Meal #11 I made Szechwan Ribs w/Mongolian Marinade which is a recipe my cousin Julie gave me a few months ago. It sounded real good and it was something new for me to try. While I was perusing through one of my local cookbooks from Hawaii I was surprise to find that I had the recipe for years and didn't even know it. This is actually a recipe from Roy's in Hawaii and it's famous chef Roy Yamaguchi.
This was really easy to make and it turned out really good. Even with the chili paste making it a little spicy, I still got the approval from my two year old. ;o). For once I used half of the recipe since I used pork spareribs instead of the baby back ribs the recipe called for. Here's the recipe to share and again no picture to share :o(.
SZECHWAN RIBS W/MONGOLIAN MARINADE
Ingredients:
4 1/2 lbs. baby back ribs (3 slabs)
2 cups Hoisin sauce
2 tbsp. garlic, minced
3 tbsp. ginger, minced
2 tbsp Chinese chili paste
1/2 cup honey
Cut ribs in half and place in a large pot of boiling water. Slow boil for an hour and half or until meat is tender (meat must have shrunk down from top of the bone at least a half inch). Remove ribs from water and let stand for abut 10 minutes until warm to touch.
For Mongolian marinade, mix Hoisin sauce, garlic, ginger, chili paste, and honey in a large mixing bowl and refrigerate. Brush Mongolian marinade on both sides of the ribs. Preheat oven to 450 degrees. Place ribs on a cooling rack and then onto a cookie sheet within the oven. Bake for 10-15 minutes or until ribs are shiny and sauce had baked into meat. Remove and let cool. Cut ribs into pieces and brush with leftover marinade. Grill rib pieces on a hibachi for a few minutes until hot, then serve and enjoy!
August 2010 Meal #10: Chop Chai
For Meal #10 I had decided to make Chop Chai which is a Korean Chop Suey. My husband and I ate this dish a long while ago at a Korean restaurant in Oregon that was really good. I had made this once before but for some reason never made it again. Since I'm on the hunt for new meals to make, I added this to the menu plan. This particular recipe I also got from the Moanalua High School Project Graduation 2008: Local Style Cooking With A Mainland Flair fundraising cookbook.
When I was ready to prepare this recipe I found that I was missing two ingredients which were carrots and watercress. The watercress apparently isn't available in my local supermarkets and I am guessing I had to make a trip to the Asian market that's kind of out of the way for me. As for the carrots, I just simply forgot to grab some. Nonetheless, after preparing with what I already had this meal turned out really well and an accompanying side dish of kim chee made it even tastier. I had also forgotten to take a picture of this too, besides since it was missing two ingredients I didn't think it was picture worthy. I'll likely make this again someday and I'll be sure to take a picture to share.
CHOP CHAI (KOREAN CHOP SUEY)
Ingredients
3 - 1.75 oz. pkgs. long rice
6 dried shiitake mushrooms
1/2 lb. flank steak, cut into fine 1-inch strips
1 cup carrots, julienned
2 tbsp. vegetable oil
salt, to taste
1 cup string beans, French cut
1/2 cup onions, sliced
1 tbsp. sesame oil
1/2 bundle watercress, cut into 2-inch lengths
Seasoning for long rice:
4 tbsp. shoyu
2 tbsp sesame oil
1 1/2 to 4 tbsp sugar, to taste
1 tbsp. roasted sesame seeds
1/8 tsp pepper
Seasoning for beef:
1/2 tsp garlic, minced
2 tbsp. shoyu
2 tbsp. sugar
2 tsp roasted sesame seeds
Directions:
Soak long rice in hot water until soft, then boil until cooked. Drain well and cut into 2-inch lengths. Soak mushrooms in hot water until soft. Squeeze to remove water; remove stems and cut into strips.
Combine seasoning ingredients for long rice. Add to long rice, tossing to coat. Set aside and toss occasionally.
Combine seasoning ingredients for beef. Add beef strips.
Fry carrots in 2 tbsp oil just until tender. Sprinkle with salt; place in a large bowl to cool. Follow same procedure with string beans; add to carrots.
Fry onions in sesame oil. Add beef strips and seasonings; fry until meat is half-done. Add mushrooms and watercress; fry until meat is cooked. Cool, then combine with carrots, beans, and long rice. Serve at room temperature.
ENJOY!
August 2010 Meal #9: Chicken Alfredo w/Fettuccine Noodles
For August's Meal #9 I planned to make Chicken Alfredo with Homemade Gnocchi, but I was a bit lazy and tired that day to make gnocchi after a long day of running errands. So instead I decided to just make the Alfredo with regular fettuccine noodles which my two year old had no problem with ;o).
I simply used a jarred Alfredo sauce, cut up chicken thighs, and fresh sliced mushrooms...a real simple dinner. The sauce in particular that I used was the Bertolli Mushroom Alfredo, which is super yummy since I love mushrooms. The jar looks like this and here's the easy recipe to go along with it. I apologize that I don't have a picture to share since I forgot to take one that night.

CHICKEN ALFREDO
Ingredients:
3 lbs. chicken thighs, cut into small pieces
2 tbsp. garlic, minced
3 cups white mushrooms, sliced
2 jars of Bertolli Mushroom Alfredo sauce
1 box fettuccine noodles, cooked
Directions:
Brown chicken and garlic until chicken is done. Add sauce and mushrooms. Mix and let simmer til mushrooms are tender. Add cooked noodles and toss. Serve.
Subscribe to:
Posts (Atom)