Showing posts with label helpful tips. Show all posts

Friday, August 3, 2012

Frugal Friday: Homemade Laundry Soap

So I'm a HUGE Pinterest fanatic and I honestly online hoard a bunch of pins that catch my eye...well mostly with things I hope to try out. One of the most successful pins that I have made is making my own homemade laundry soap.  A friend of mine actually gave me the idea first a long while ago but I never got around to trying it out for myself until I stumbled upon it on Pinterest.

I have sensitive skin and have been an avid Tide laundry soap user for years and was leary on using the homemade recipe for fear of breaking out in eczema or making my skin condition worse.  However, my friend said her kids have sensitve skin too and they didn't break out in anything.  Also, she even used it on her baby's clothing instead of using Dreft baby laundry detergent which is stinking expensive.  The recipe my friend used is quite similar to one I found online via Pinterest at Being Creative to Keep My Sanity so I went with that.

So with the hubby's approval I went forth and got all the ingredients/supplies that I needed which I could find at my local Wal-Mart. 

Here's the list:
1 4 lb 12 oz box Borax (2.15 kg or 76 oz) found in the detergent isle
1 4 lb box Arm & Hammer Baking Soda (1.81 kg) found in the cooking isle
1 box Arm & Hammer Super Washing Soda 55 oz (3 lb 7 oz) found in the detergent isle
3 bars of Fels-Naptha soap, found in the detergent isle (if you use Zote bars use 2 bars instead, Zote can be found at Home Depot)
2 small containers of Oxy Clean or store brand Oxy Clean (try to get about 3.5 lbs total (1.58 kg)) found in the detergent isle. (I already had a Costco sized box of the stuff so I just measured this out in my batch)


The instructions said to grate the Fels Naptha soap on a cheese grater or use a food processor.  I don't have a food processor so I went for the cheese grater option (I got a separate one just for this purpose).  That was a BIG mistake to do.  Not only did it take me forever to grate one bar of soap, the soap would get clogged in the holes of the grater.  I really didn't want to use any of my kitchen appliances and have them "tainted" with soap, but I gave in and first used my automatic shredder to grate the soap and then used my blender to ground up the "grated cheeselike soap".  After all of that I mixed everything into a big enough container. 


I made this batch of soap back in the beginning of December 2011 and it cost me roughly $12-$15.  The cool part of making your own homemade laundry soap is that all you need to use is just 1 tablespoon (I actually use 2 tablespoons), so this whole thing will stretch for a long while. Here are some pictures of my batch of soap and I apologize that they are not of good quality since I'm too LAZY to use my actual digital camera and just use my iPhone instead. The last pic is as of today and I still have lots left to use! I am guessing it'll last me probably a few more months and I'll be surprised if I'll get to stretch out till this December. If that happens then that means I would have only spent $12-$15 for laundry soap for the WHOLE year! WOW! Whereas before I would clip coupons for Tide soap and wait for a sale to come up, then in the end I would have spent over $100 in soap for an entire year. YIKES!


I highly recommend trying this out if you're trying to cut costs somewhere in your household budget. I use it for all of our laundry and even for our infant son's clothing too ever since he was born six months ago.  I got my sister in Hawaii on the bandwagon, she uses more than the 1-2 tablespoon it asks for so she's on making her second batch of soap, but she's still saving $$$.  Go to Being Creative to Keep My Sanity for more of the how to and go over the comments if you have any concerns.  Especially for those who have those fancy schmanchy HE washers ;p, I got an old school top loader and the soap works absolutely fine. 

So this is my first installment on hopefully a weekly Frugal Friday tid bit that I have tried on my own or maybe something one of you could benefit from. 

On that note HAPPY ALOHA FRIDAY!!

Tuesday, September 13, 2011

Rah Rah Ah Ah Ah...

This post isn't about Lady Gaga, but making my own homemade pom poms. Heh, that part of Bad Romance just popped into my mind and gave me the idea for the post title.

Anyway, it's college football season and we were lucky enough to catch the season opener game for the University of Hawaii on our recent trip home. Also, this weekend we get to watch another UH Warrior football game in Las Vegas. Whoot Whoot!! We got a bunch of Warrior gear and we're all good to go.

However, I felt we were missing something and after watching another game on tv it dawned on me that it was pom poms. I was watching the crowd in this particular game and they were shaking around pom poms in the school colors. Then it gave me the idea to make on my own so I went to the best tutorial site...YouTube.

I found some that were made with crepe paper and they looked pretty lame. Until I found a tutorial that really caught my eye and seemed really easy to follow. I can thank Pinellas County HIPPY Helps for this tutorial. I'm currently writing up this post on my phone so I'll have to update with the actual tutorial later.

For this pom pom creation it only cost me less than $5 to make and I just used three materials. Here's the how to with a minor addition.

Homemade Pom Poms

Materials:
Plastic tablecovers (In any color you like.)
Scissors
Electoral tape


Directions:
Open up the tablecloth completely, fold in half, and cut in half. Keep cutting the tablecloth in half until you get squares around the size of 12"x12" or 14"x14" depending on the original size of the tablecloth. When done cutting they would look like this below.


Next start layering your cut pieces in alternating colors using a total of 20 sheets. I used clothespins to help hold the sheets together so they don't slip around when cutting.


Once the sheets are clipped together start cutting about inch wide strips one half of the sheet stopping about a half inch toward the center. One half will look like this below.


Then continue to do the same on the other half.


Next take off one of the clothespins and start gathering the uncut center. I gathered the center in a fan like hold till I reached the end.


Once gathered, wrap the electrical tape tightly around the center about five times.


Lastly, start fluffing each piece on both sides. Separate each piece gently to alternating sides. Once done the pom pom will be full and you won't even see the electric taped center. Here's how they will look.


I'm going to make another set using the other UH colors. Can't wait to bring these to the game this weekend.

GO WARRIORS!!

Here's the tutorial video that you all can watch.  Happy crafting!


Saturday, May 21, 2011

Colored Balls...

So with this whole phenom of Bakerella's Cake Balls I jumped on the wagon in making these now. 

The thing I didn't mention in my previous post when I first made them is that I found a WAY cheaper way to get candy melts.  Rather than using pre-packaged Wilton brand candy melts that you can find already colored, I actually found chocolate and vanilla candy melts in the bulk foods section of my local grocery store at Winco.  The Wilton candy melts come in bags of 14 oz. at around $2.99 regular price.  Whereas, in the bulk bins I got my candy melts for $2.38/lb! Even though I would have to use oil based dye to color the white melts it still cheaper than buying the melts pre-packaged and I can deal with the coloring part. 

If you have a bulk foods section in your local grocery store go and look if you can find the candy melts.  I've been shopping at the grocery store for the past 10 years and have only really discovered it in the recent months.  I don't know why I never thought of buying most of my grocery items in that section, it would have helped me save some money in the past.

With that said this past Easter I made some Devil's Food cake balls just to play around with flavor.  With this batch I ended up using vanilla flavored candy melts and used oil based dye to color them baby blue and lavender. 


I had to play around with the dyes a bit to get the color I wanted.  I first started out with the blue coloring and used a toothpick dipped into the dye and let it drip into the melted chocolate.  After a few tries I got the color I desired.  With this batch of cake balls I think I made about 80, so I colored half of it blue and the other half lavendar.  When the first batch was done I still had some blue coating left, so I just added more candy melts and added red dye till I reached the lavendar shade I wanted.

After this batch was done and taste test commenced.  I got a thumbs up from my Lil Booger and friends!  Although they still preferred the red velvet cake instead LOL.  It was good experimentation for me and try to get the cake balls coated nicer. 

Here's how they turned out and a few pics of my supplies.

Vanilla Candy Melts


Oil Based Candy Colors


Vanilla Melts Colored Lavender


Light Blue Colored Cake Balls


Lavender Colored Cake Balls


Tuesday, April 5, 2011

It's T-Shirt Time! Criss Cross Technique...

After doing the weaving technique I wanted to try out other ideas, so I went back to YouTube to find other cool t-shirt cutting techniques.

The one idea that caught my eye was by Salinabear and she has several other tutorial vids that are just as cool.  She did this really cool criss cross technique that intrigued me and I had never seen before.  It looked a little complicated so I had to use an old t-shirt of my hubby's as a guinea pig before I even started on the actual shirt that I was interested in cutting up. 

This technique requires you to cut tiny holes into the shirt for weaving the strips into.  I ran into a little problem with that since I had a hard time finding where I actually cut the holes.  I should actually clarify that the video tutorial says to cut tiny holes but I ended up just poking holes with my scissors instead since I wanted to make sure that when I weaved the strips through they would stay put and not fall out.

Anyway if you follow my technique of making holes, I HIGHLY recommend that you mark your holes with tailor's chalk on dark material or disappearing water soluble pen on light material.  I ended up missing a hole when I practiced on my guinea pig shirt.

Here are some pics of my cutting process along with the actual tutorial vid.

Cut back into strips and stretch out.


Separate your strips to be tied in 4 different sections.


The final project.


I followed just the criss cross cutting technique and adjusted the shirt to fit me better since it's one of my hubby's old XL t-shirts.  Here is the video tutorial by Salinabear and be sure to check out her other tutorials as well. 

Happy Cutting!

It's T-Shirt Time! Weaving Technique...

I wish I never gave away a bunch of old tees that I had so I could experiment with the cool art of t-shirt cutting.  So for now I'm using my hubby's old tees for practice and just adjust them to fit me. 

I started my hand in t-shirt cutting a few months ago when I wanted to match my son's Plex Halloween costume.  I just the weaving technique on the back, cut out the neckline, and tied colored ribbon to scrunch up the sleeves. This turned out pretty good for my first time and this is how it turned out.


I later did more t-shirt cutting for myself, a friend, and her daughter using the same technique when we went to a Yo Gabba Gabba concert.  I didn't have enough time to experiment with different styles so I just did the same weaving technique.  I ended up weaving the back of my t-shirt three times since it was too loose.  Here's how our t-shirts turned out.

Danni's Tee


Suelynne's Tee


My Tee


I'd give you the rundown tutorial but I'd totally screw up on writing it correctly.  So rather than confuse the heck out of you here's the YouTube video by MakeupByRisa that I used to get the idea of just the weaving technique.  Everything else I did to my tee was just by going with the flow on how to make it cute. 

Hope you try this out and you rock some cool tees!


Thursday, March 17, 2011

DIY Nail Polish

I subscribe to the craft website Craft Gossip via Facebook and they post all kinds of daily craft projects done by other crafters. One craft project that caught my eye recently was DIY Nail Polish. The site featured for that project was The Lifestyle Lounge.

The Lifestyle Lounge featured two how-to's but I chose to try out the first option which seemed the easiest to do. After getting my supplies I set out to try my little experiment out earlier today.

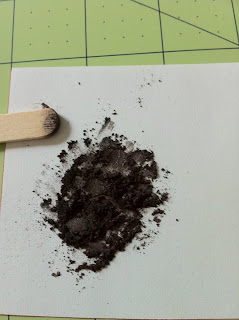
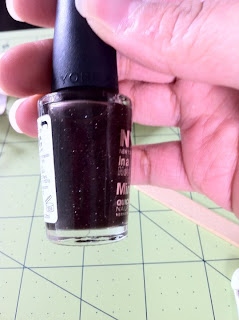
Here's the supply list and directions from The Lifestyle Lounge.  I just got a cheap $1 eyeshadow quad and a $2 bottle of clear polish from Target since I didn't want spend too much on this and not have it work.  This actually did work with cheap supplies and I can't wait to make more.  The bottle of DIY nail polish in the end cost me about $3....not too shabby ;o).

HOMEMADE NAIL POLISH
Materials Required:
Clear Nail Polish
Colored Eye Shadow/ Pigment Makeup
 Nail Polish Remover
Fine Glitter Dust (optional)
Small Funnel
Scrap of Paper
Plastic Baggie


Procedure:
Open up the bottle of clear nail polish and place the funnel end into the bottle.

Block the hole of the funnel by placing a small scrap of paper at the bottom.


Place some eye shadow in a sealed plastic bag.

Gently press the eye shadow and crush it till you get a lump-free, powdery consistency.


Transfer the powdered eye shadow or pigment makeup into the funnel.

If you desire, you can add a very small amount of fine glitter to the funnel mixture.

Carefully mix the fine glitter and eye shadow/ pigment makeup before you remove the scrap of paper.


Remove the scrap of paper and allow the mixture to enter the bottle.

Remove the funnel from the bottle and replace the cap on the clear nail polish.

Shake the bottle well for about 2 minutes.

You can add more eye shadow/ pigment makeup or glitter in case the resultant color is not up to your liking.

In case your nail polish gets thick or lumpy, add a few drops of nail polish remover and shake for one minute to thin the nail polish.

Tuesday, March 1, 2011

Thrifty Tip

I found this book at Urban Outfitters at a mall in Denver when I was visiting my brother called "The Big-Ass Book of Crafts" by Mark Montano.  I've seen him featured on a tv show called "She's Crafty" on the ION channel and he's also on TLC's "While You Were Out" show.

Me being a craftaholic I was really curious on what I could find in this book but I wasn't about the shell out $20 + Denver sales tax. I figured I can find it cheaper later at Barnes & Noble or something which I did for a good price.  However, I checked and see if my local library had in stock so I can look through it and see if it was really worth me buying.  I put in a request to reserve my copy and it was ready for pick up a week later.  I was really excited to go through the book but I was kind of disappointed since most of the stuff wasn't really my taste and my hubby wouldn't go for most of it being decorated in our home.

I did though come across this one idea that caught my eye and it was how to make homemade dryer sheets.  It never really occurred to me that dryer sheets are really just fabric softener, like Downey, dried onto a small piece of fabric.  Same stuff you put into the washer but in a solid form.  So to help save money you can make your very own dryer sheets with old scraps of fabric and a bottle of liquid softener.  This is even better for those you have loads and loads done every week and are on a very tight budget.

Here's all you need:

  • 1 yard of cotton fabric, any pattern
  • Pinking shears
  • Spray bottle
  • 1 bottle of fabric softener, any brand
    • if you use concentrated softenter, just mix one part softener and one part water.
Optional: Sewing machine, with zigzag stitch capability.  Sew a zigzag stitch around the fabric pieces to prevent fraying and to make them look pretty.

Directions:
  • Cut your cotton fabric inot 8" x 8" squares
  • Fill your spray bottle with fabric softener.
  • When you're ready to do a load of laundry, spray a cotton square six to eight times, and toss it in the dryer.
**Wash your squares every once in a while to remove buildup of softener.  With a little care, these dryer sheets should last for years.**