Saturday, September 4, 2010

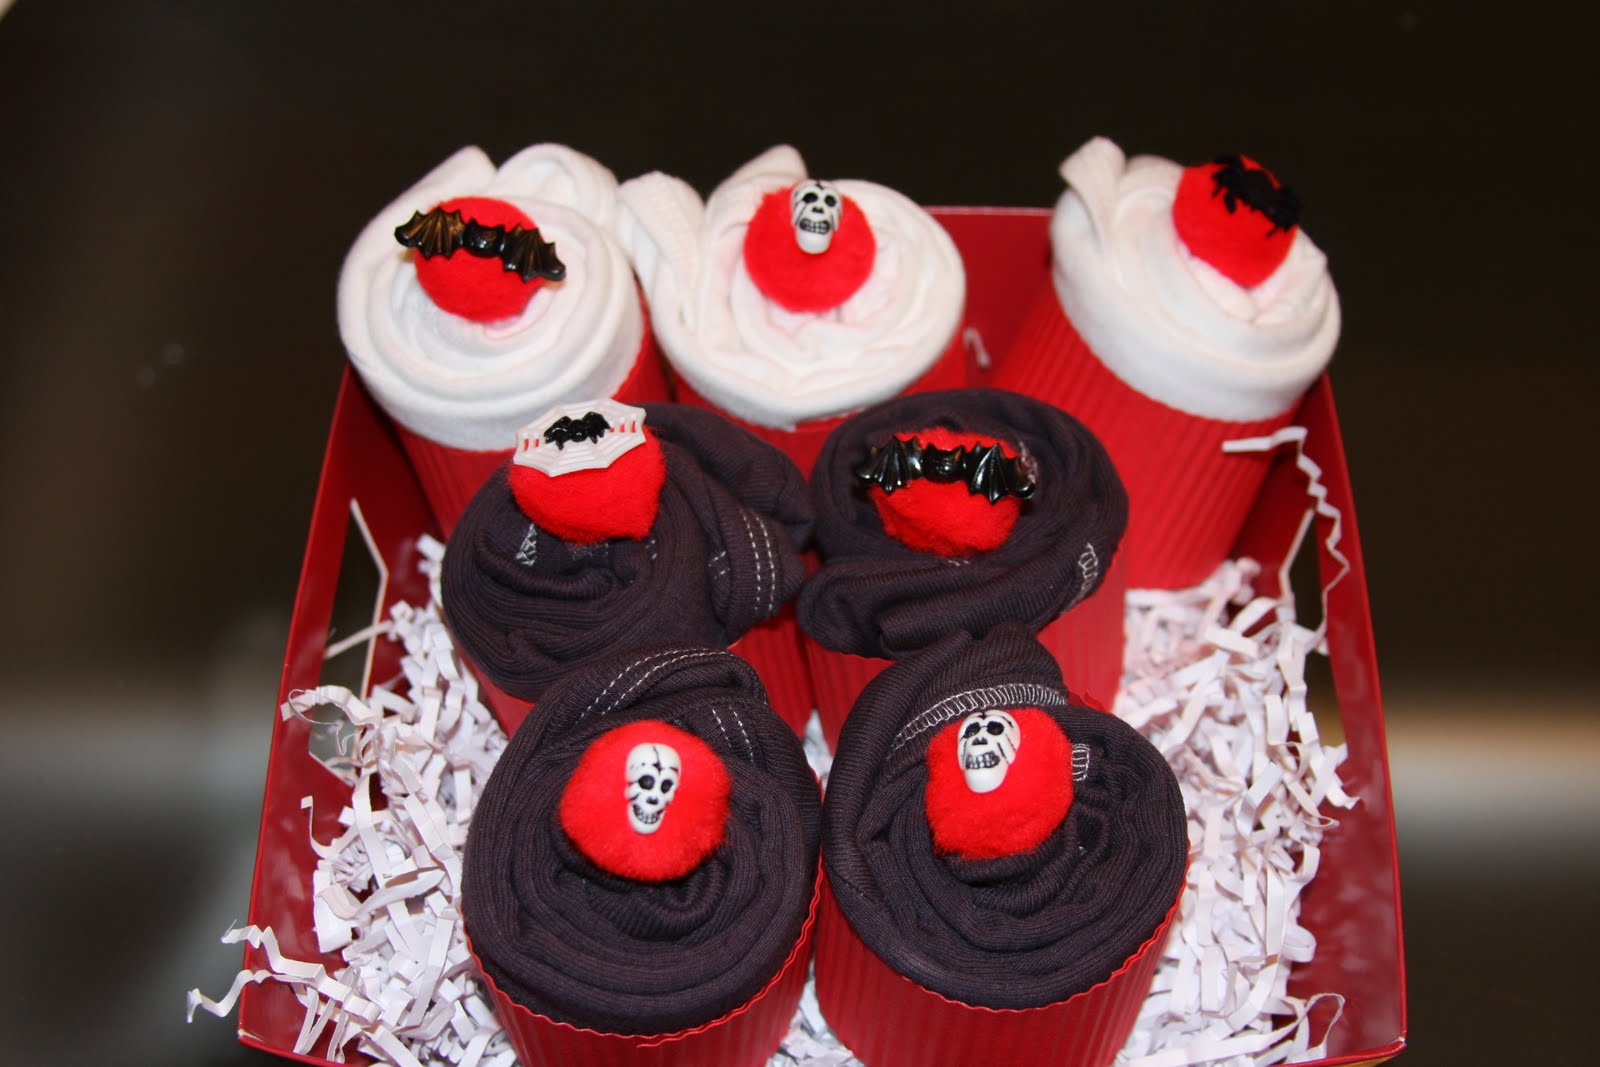
My First Onesie Cupcakes...


A long while ago I was Internet researching on different baby gift items to create on your own.  One of the cute and easy gifts I found were onesie cupcakes.  They were just plain colored baby onesies rolled up decorated with little embellishments and stuck into a muffin paper cup thing.  They looked simple enough to make and I figured I could do that myself. 

Since I had a baby shower coming up, the mother and father had a very special and specific request on what color clothing they preferred for their baby.  They had a "Nightmare Before Christmas" theme and that was out of the normal baby theme.  I found it as a challenge with open arms to create something as close to that theme as possible. 

Thus this was created and an evolution of onesie cupcake gifts were created.  I dyed some onesies and added cute iron on appliques to each of them, turned them into "cupcakes", and added little embellishments.

"That's How I Roll" & "eat, sleep, poop, cry"


"My Dad Rocks" & "My Mom Rocks"


"So Fresh & So Clean", "Born to Rock", & "AB/CD"


Cupcake Creation


All Packaged & Ready to go

Friday, September 3, 2010

Plush Kid's Neck Pillow

In addition to my sister's request for a makeup bag, she also asked me if I could sew up a kid's neck pillow for my nephew.  She was planning on buying one but those suckers are kind of expensive, so she figured that I could probably make one.  So I did my search on the Internet to find a tutorial on how to make one.  I pretty much knew it'd be just like sewing a pillow and stuffing it, but I figure I just check and see if there was any specific way on to make one. 

Lo and behold I found quite a lot of tutorials, even better I found one that had a pattern at the craft site Ucreate. SWEET!! I can't draw to save my life so having a pattern helped me cut the fabric as even as possible.  Since my sister lives in Hawaii I tried to find material that would be soft, comfortable, and wouldn't feel irritating against my nephew's skin on days he uses the neck pillow during hot/humid weather.  I found a soft plush material with zoo animals on it and the bonus was that it was on sale AND I had a coupon for extra off.  I bought a yard of it since I figured I'd make one for my son too and I could also make a practice one as well.

For the first pillow I made I cut it exactly to the pattern I had and discovered while stitching it up that the material is so soft that I had a hard time trying to keep the seams together.  Perhaps I needed to change the needle or whatever since I just use the standard needle.  Nonetheless, I got it stitched up and ready to be stuffed.  I used ultra plush stuffing to make it nice, soft, and comfy.  The last procedure was to whip stitch that bugger up which I loathe and could never get right....well maybe never learned how to do it properly before.  So instead I just smooshed down opening and stitched it closed with my machine...yeah lazy I know ha ha.

The end result came out alright and needed a few adjustments.  So for the pillow I made for my nephew I just added about half an inch extra material to help stitch it up better.  This worked out perfectly since I didn't have problems with stitching up the seams this time.  I wasn't particularly happy with the way I closed up the first pillow and decided to overcome my dislike for whip stitching.  So I referred to a YouTube video and got cracking on closing that pillow up.  What do you know? I think I mastered whip stitching ha ha!  Pillow #2 turned out a lot better and here it is below.

PLUSH KID'S NECK PILLOW


Pleated Makeup Bag & Tissue Holder

My sister asked me to sew her up a makeup bag and I happily took on the challenge.  To start off I sent her a few links of different websites on possible makeup bags that she could choose a style from.  Luckily she chose one that was easy enough for me to follow and try out.

I first made one for myself at a trial run before I made one for my sister since I wanted to make her one with a nylon lining for easy cleanup.  I didn't want to waste the remnant nylon I got from the fabric store since the piece wasn't that large.  In addition to making the makeup bags, I also sewed up some tissue holders as well since it looked really simple and it compliments the bags too.  I found both tutorials at the blogsite Skip to My Lou along with some other great crafting tutorials.

So here are my latest creations.

Cherry Blossom &Damask Print


Inside Lining


Tokidoki & Floral Print


Inside Lined w/Nylon


Thursday, September 2, 2010

My Sew Story...

I have to admit that I'm a novice seamstress and I am learning as I go through trial and error.  The only formal training that I had for sewing was in my 8th grade sewing elective class.  I remember I sewed a pillow (that's actually still at my parents house), a bean bag rabbit that I fondly remember my neighbor James named "Lucille", and a windsock.  I haven't sewn anything since then and really had no desire to until about two years ago.

My son was born and I found it astonishing how much burp cloths I went through wiping up spit ups from that lil person.  I ran out of burp cloths and was washing a load of his clothes like every other day in order to get a clean burp cloth.  Then I had an idea that I could either sew/make my own burp cloths or go buy some new ones that were already pricey to begin with.  So my hubby gave me permission to buy my first sewing machine ever and I haven't looked back since. 

I bought a Singer 4166 when Costco had a coupon for it and I didn't even research it. 


I just bought it because of the price, little did I know this particular machine was actually little advanced for the novice me.  That didn't matter to me since I really LOVE my machine after making a few things since the day I bought it.  Firing up the machine the very first time was like riding a bike (yeah to those who know me, I don't know how to ride a bike. we'll save that story for another time.) and my first burp cloth was born. 

I made my son's burp cloths out of decorative fleece and towel material with hopes of having it absorb the spit up action my son does.  It was so easy, just a few straight lines, and sewing up the closure.  I made a whole bunch for him and my nephew who is five months younger than my son. 

From my first sewing project I have created more things in the last two years and working my way up to more advanced creations.  As I mentioned I am learning through trial and error, I have borrowed books from the library to help refresh my memory of basic sewing techniques, and the INTERNET is wonderful for finding tutorials especially YOUTUBE.  I've sewn a few new things lately and I'll post about them along with their pictures if there are any. 

So that's my sew story and I'm sticking to it.

September 2010 Meal Plan

So I've got the ball rolling with this month's menu plan since I pretty much slacked off for the month of August.  There are quite a few new recipes that I've added and have never tried before, so here's to experimentation.  I dusted off the cobwebs from some of the cookbooks I've collected over the years especially those little ones you find at the checkout stand at your supermarket.  I had developed a habit of buying those in hopes of implementing them but I never did.  So now that I've started this meal plan experiment I am going to try to put all those cookbooks to good use.

I rolled over whatever meals for August I had planned so that at least helped me not think up new dishes to make.  So here's the menu plan for September and I hope to try to stick to as much as I can.

SEPTEMBER MENU PLAN
  1. Baked Chicken w/Gravy
  2. Mushroom Risotto w/Italian Sausage
  3. Baked Beef Enchilada
  4. Baked Ratatouille
  5. Chicken Masala w/Roti Chapati
  6. Baby Back Ribs
  7. Spaghetti Goulash
  8. Crab Supreme
  9. Chinese Roast Chicken
  10. Eggplant Sausage Casserole
  11. Quickie Salisbury Steak
  12. Shrimp Cabonara
  13. Chicken & Sausage Gumbo
  14. Beef Broccoli
  15. Roast Pork w/Gravy
  16. Shoyu/Sesame Ahi
  17. Miki
  18. Pot Roast w/Veggies in Crockpot
  19. Port & Balatong (Mung Beans)
  20. Shrimp Scampi
  21. Chicken Long Rice
  22. Beef Wellington
  23. Pinakbet
  24. Baked Salmon w/Crab Stuffing
  25. Oyster Chicken w/Noodles
  26. Taco Crescent Bake
  27. Lauya
  28. Paella w/Shrimp & Chicken
  29. Cold Ginger Chicken
  30. Pad Thai

August 2010 Meal #12: Thai Coconut Shrimp Replaced By Black Bean Garlic Shrimp

My Meal #12 was originally supposed to be Thai Coconut Shrimp but instead I replaced it to be Black Bean Garlic Shrimp.  I unfortunately forgot what cookbook I had seen that dish in and gave up trying to find it in my mountain of cookbooks.  So the next best and easiest thing to cook up that shrimp that I had was to use some black bean sauce. 

I've actually never made this before but my husband has, so this couldn't be hard right?  Well it wasn't, I actually used the same ingredients as I use in the Pork & Eggplant w/Black Bean Garlic Sauce recipe and just used shrimp.  All in about 10 minutes dinner was done and it was very yummy too.  Alas, I don't have a picture of this as well...yeah I know I know I'm slacking in that department but here's the super easy recipe.

BLACK BEAN GARLIC SHRIMP
Ingredients:
1 lb. shrimp (I had used the smallest sized raw shrimp, you can use any sized shrimp to your liking. You can either leave the shell on or devein and peel.)
3 tbsp. garlic, minced
2 tbsp. butter or margarine
5 tbsp. black bean sauce
2 tbsp. garlic chili sauce

Directions:
Melt garlic in pan.  Add all ingredients and cook until shrimp is cooked (no longer black/gray in color).

August 2010 Meal #11: Szechwan Ribs w/Mongolian Marinade

 For Meal #11 I made Szechwan Ribs w/Mongolian Marinade which is a recipe my cousin Julie gave me a few months ago.  It sounded real good and it was something new for me to try.  While I was perusing through one of my local cookbooks from Hawaii I was surprise to find that I had the recipe for years and didn't even know it.  This is actually a recipe from Roy's in Hawaii and it's famous chef Roy Yamaguchi. 

This was really easy to make and it turned out really good.  Even with the chili paste making it a little spicy, I still got the approval from my two year old. ;o).  For once I used half of the recipe since I used pork spareribs instead of the baby back ribs the recipe called for.  Here's the recipe to share and again no picture to share :o(.

SZECHWAN RIBS W/MONGOLIAN MARINADE
Ingredients:
4 1/2 lbs. baby back ribs (3 slabs)
2 cups Hoisin sauce
2 tbsp. garlic, minced
3 tbsp. ginger, minced
2 tbsp Chinese chili paste
1/2 cup honey

Cut ribs in half and place in a large pot of boiling water.  Slow boil for an hour and half or until meat is tender (meat must have shrunk down from top of the bone at least a half inch).  Remove ribs from water and let stand for abut 10 minutes until warm to touch.

For Mongolian marinade, mix Hoisin sauce, garlic, ginger, chili paste, and honey in a large mixing bowl and refrigerate.  Brush Mongolian marinade on both sides of the ribs.  Preheat oven to 450 degrees.  Place ribs on a cooling rack and then onto a cookie sheet within the oven.  Bake for 10-15 minutes or until ribs are shiny and sauce had baked into meat.  Remove and let cool.  Cut ribs into pieces and brush with leftover marinade.  Grill rib pieces on a hibachi for a few minutes until hot, then serve and enjoy!