Showing posts with label arts. Show all posts

Tuesday, September 13, 2011

Rah Rah Ah Ah Ah...

This post isn't about Lady Gaga, but making my own homemade pom poms. Heh, that part of Bad Romance just popped into my mind and gave me the idea for the post title.

Anyway, it's college football season and we were lucky enough to catch the season opener game for the University of Hawaii on our recent trip home. Also, this weekend we get to watch another UH Warrior football game in Las Vegas. Whoot Whoot!! We got a bunch of Warrior gear and we're all good to go.

However, I felt we were missing something and after watching another game on tv it dawned on me that it was pom poms. I was watching the crowd in this particular game and they were shaking around pom poms in the school colors. Then it gave me the idea to make on my own so I went to the best tutorial site...YouTube.

I found some that were made with crepe paper and they looked pretty lame. Until I found a tutorial that really caught my eye and seemed really easy to follow. I can thank Pinellas County HIPPY Helps for this tutorial. I'm currently writing up this post on my phone so I'll have to update with the actual tutorial later.

For this pom pom creation it only cost me less than $5 to make and I just used three materials. Here's the how to with a minor addition.

Homemade Pom Poms

Materials:
Plastic tablecovers (In any color you like.)
Scissors
Electoral tape


Directions:
Open up the tablecloth completely, fold in half, and cut in half. Keep cutting the tablecloth in half until you get squares around the size of 12"x12" or 14"x14" depending on the original size of the tablecloth. When done cutting they would look like this below.


Next start layering your cut pieces in alternating colors using a total of 20 sheets. I used clothespins to help hold the sheets together so they don't slip around when cutting.


Once the sheets are clipped together start cutting about inch wide strips one half of the sheet stopping about a half inch toward the center. One half will look like this below.


Then continue to do the same on the other half.


Next take off one of the clothespins and start gathering the uncut center. I gathered the center in a fan like hold till I reached the end.


Once gathered, wrap the electrical tape tightly around the center about five times.


Lastly, start fluffing each piece on both sides. Separate each piece gently to alternating sides. Once done the pom pom will be full and you won't even see the electric taped center. Here's how they will look.


I'm going to make another set using the other UH colors. Can't wait to bring these to the game this weekend.

GO WARRIORS!!

Here's the tutorial video that you all can watch.  Happy crafting!


Saturday, April 9, 2011

I WON!!

I totally forgot I had entered a giveaway at the blog site Rad Linc Crafts nearly a month ago since March was National Craft Month.  The giveaway was for a book on how to create nylon flowers and a small kit to get me started. 

I absolutely forgot that I even entered this giveaway and only remembered when I had seen a comment posted on my DIY Nail Polish post made be Fe at Rad Linc Crafts telling me that I won.  Again, sorry Fe that I didn't get in touch with you any sooner.

I am so excited that I won since I've been wanting to try my hand in making nylon flowers since I've already made fabric ones already.  I don't have a picture sample of my own to show you how a nylon flower looks like but you can check out one of Rad Linc Crafts' tutorials on "Making Nylon Flowers, Part 3: Making Plumerias" to get an idea.

In addition to checking out that tutorial, check out her entire blog.  She's got other great craft tutorials and recipes as well.

I can't wait to receive my giveaway prize and start making some nylon flowers.  I'll of course be sure to write up a blog when I do ;o).

Tuesday, April 5, 2011

It's T-Shirt Time! Criss Cross Technique...

After doing the weaving technique I wanted to try out other ideas, so I went back to YouTube to find other cool t-shirt cutting techniques.

The one idea that caught my eye was by Salinabear and she has several other tutorial vids that are just as cool.  She did this really cool criss cross technique that intrigued me and I had never seen before.  It looked a little complicated so I had to use an old t-shirt of my hubby's as a guinea pig before I even started on the actual shirt that I was interested in cutting up. 

This technique requires you to cut tiny holes into the shirt for weaving the strips into.  I ran into a little problem with that since I had a hard time finding where I actually cut the holes.  I should actually clarify that the video tutorial says to cut tiny holes but I ended up just poking holes with my scissors instead since I wanted to make sure that when I weaved the strips through they would stay put and not fall out.

Anyway if you follow my technique of making holes, I HIGHLY recommend that you mark your holes with tailor's chalk on dark material or disappearing water soluble pen on light material.  I ended up missing a hole when I practiced on my guinea pig shirt.

Here are some pics of my cutting process along with the actual tutorial vid.

Cut back into strips and stretch out.


Separate your strips to be tied in 4 different sections.


The final project.


I followed just the criss cross cutting technique and adjusted the shirt to fit me better since it's one of my hubby's old XL t-shirts.  Here is the video tutorial by Salinabear and be sure to check out her other tutorials as well. 

Happy Cutting!

It's T-Shirt Time! Weaving Technique...

I wish I never gave away a bunch of old tees that I had so I could experiment with the cool art of t-shirt cutting.  So for now I'm using my hubby's old tees for practice and just adjust them to fit me. 

I started my hand in t-shirt cutting a few months ago when I wanted to match my son's Plex Halloween costume.  I just the weaving technique on the back, cut out the neckline, and tied colored ribbon to scrunch up the sleeves. This turned out pretty good for my first time and this is how it turned out.


I later did more t-shirt cutting for myself, a friend, and her daughter using the same technique when we went to a Yo Gabba Gabba concert.  I didn't have enough time to experiment with different styles so I just did the same weaving technique.  I ended up weaving the back of my t-shirt three times since it was too loose.  Here's how our t-shirts turned out.

Danni's Tee


Suelynne's Tee


My Tee


I'd give you the rundown tutorial but I'd totally screw up on writing it correctly.  So rather than confuse the heck out of you here's the YouTube video by MakeupByRisa that I used to get the idea of just the weaving technique.  Everything else I did to my tee was just by going with the flow on how to make it cute. 

Hope you try this out and you rock some cool tees!


Thursday, March 17, 2011

DIY Nail Polish

I subscribe to the craft website Craft Gossip via Facebook and they post all kinds of daily craft projects done by other crafters. One craft project that caught my eye recently was DIY Nail Polish. The site featured for that project was The Lifestyle Lounge.

The Lifestyle Lounge featured two how-to's but I chose to try out the first option which seemed the easiest to do. After getting my supplies I set out to try my little experiment out earlier today.

Here's the supply list and directions from The Lifestyle Lounge.  I just got a cheap $1 eyeshadow quad and a $2 bottle of clear polish from Target since I didn't want spend too much on this and not have it work.  This actually did work with cheap supplies and I can't wait to make more.  The bottle of DIY nail polish in the end cost me about $3....not too shabby ;o).

HOMEMADE NAIL POLISH
Materials Required:
Clear Nail Polish
Colored Eye Shadow/ Pigment Makeup
 Nail Polish Remover
Fine Glitter Dust (optional)
Small Funnel
Scrap of Paper
Plastic Baggie


Procedure:
Open up the bottle of clear nail polish and place the funnel end into the bottle.

Block the hole of the funnel by placing a small scrap of paper at the bottom.


Place some eye shadow in a sealed plastic bag.

Gently press the eye shadow and crush it till you get a lump-free, powdery consistency.


Transfer the powdered eye shadow or pigment makeup into the funnel.

If you desire, you can add a very small amount of fine glitter to the funnel mixture.

Carefully mix the fine glitter and eye shadow/ pigment makeup before you remove the scrap of paper.


Remove the scrap of paper and allow the mixture to enter the bottle.

Remove the funnel from the bottle and replace the cap on the clear nail polish.

Shake the bottle well for about 2 minutes.

You can add more eye shadow/ pigment makeup or glitter in case the resultant color is not up to your liking.

In case your nail polish gets thick or lumpy, add a few drops of nail polish remover and shake for one minute to thin the nail polish.

Saturday, October 16, 2010

It's A Baby Shower!

A few weeks ago I had the pleasure of throwing a friend's baby shower.  They already have two adorable boys and baby #3 was going to be a SURPRISE!  I've been used to knowing what gender I'm working with when I create baby shower gifts so it makes the process simpler with the specific pink for girls and blue for boys.  Not this time since I had to work with gender neutral colors and I found it to be a little more challenging to keep the color and print selection in the middle.  Nonetheless I like the challenge since it allows me to think more openly and I got to peruse more of the fabric section at Joann's, which by the way made my eyes go O_O in delight LOL.

Since I've been making alot of the onesie cupcakes and washcloth lollipops for recent gifts, I wanted to make another diaper wreath in addition try my hand in making fabric panelled burp cloths, a diaper pouch, and a blanket.  I can't remember where exactly I found the site where I learned how to construct a diaper wreath, all I did was Google "How to make a diaper wreath?" and a plethora of information came up.  I learned how to create the simple to do diaper burp cloths from the blog Chickpea Sewing Studio and she has other great tutorials as well.  Here's the tutorial link.

I also tried my hand in making a diaper clutch and I found a great tutorial on the blog site Diary of a Quilter.  I followed her tutorial exactly with the exception that I added a small handle on the side to attach a clip if wanted.  Here's the tutorial link.

As for the blanket, all I did was get 1-yard of printed flannel, 1-yard of super plush material, and enough satin binding and sewed the two 1-yard pieces with the binding on the edges.  Here are the results of my baby gifts to Baby Boy or Girl that we can't wait to meet.  Oh, also mommy was very happy to receive these very special gifts and the color of the material was perfect since she likes the color brown ^_^

Diaper Clutch

Diaper Burp Cloths

Baby Blanket

Diaper Wreath


Thursday, October 14, 2010

It's Been Nearly A Month...

It's been nearly a month since I've last blogged and that was just for a giveaway I tried to win for.  Lots has happened since then and I have lots to blog about.  Been caught up with planning a baby shower for some dear friends and I got to create a few new things for their baby, which I'll get to post eventually.  I have been keeping up with the most recent meal plan but haven't had the chance to post the recipes/meals.  There aren't much pics of them since my hubbys DSLR is gone on the blink and is in the shop as we speak.  I tried to take some pics with my regular p/s camera and phone camera when I could remember, but of course the quality isn't as great.  I don't even remember where I last left off on the menu, but eh I'll do what I can do in updating it.  As for October's Menu Plan, I'll just continue to work through September's Menu Plan until I run out of meals and create one for November.

During my little hiatus me and my lil booger got to go to Denver, CO for the very first time.  My brother accepted a transfer position from Maui to Denver, so I went there to help him settle in.  There are a few pics that I took of places we went but I missed out taking pics of the Bronco's Stadium and where The Rockie's play at.  I'm pretty sure this won't be the last time we'll be going to Denver to visit my brother, so there's always going to be more picture opportunities.

So enough of me blabbing on, I'll get to work on updating some posts with some recipes and I'm sure some of you have been jonesing for ;o)

Thursday, September 16, 2010

Becoming a Bridal Shower "Cake"...

I've only made one bridal shower "cake" before and that was three years ago for my friend Suelynne.  It was simply decorated with ribbon and fake flower hydrangeas.  The cake which was made out of two bath towels, two hand towels, and two washcloths turned out really pretty, so pretty that till this day Suelynne has never taken it apart.  In fact it's still on the poster board with the crinkled stuffing at the bottom tier same as the day I presented it to her.  Here is what that towel cake looked like.


Fast forward nearly three years later and I have another opportunity to make a bridal shower towel cake.  Only this time I wanted to do something a little different and try my hand in making homemade fabric flowers.  Our friends Jenna and Wilson are getting married in Oahu next February so it only made sense for me to decorate the towel cake with plumeria flours. 

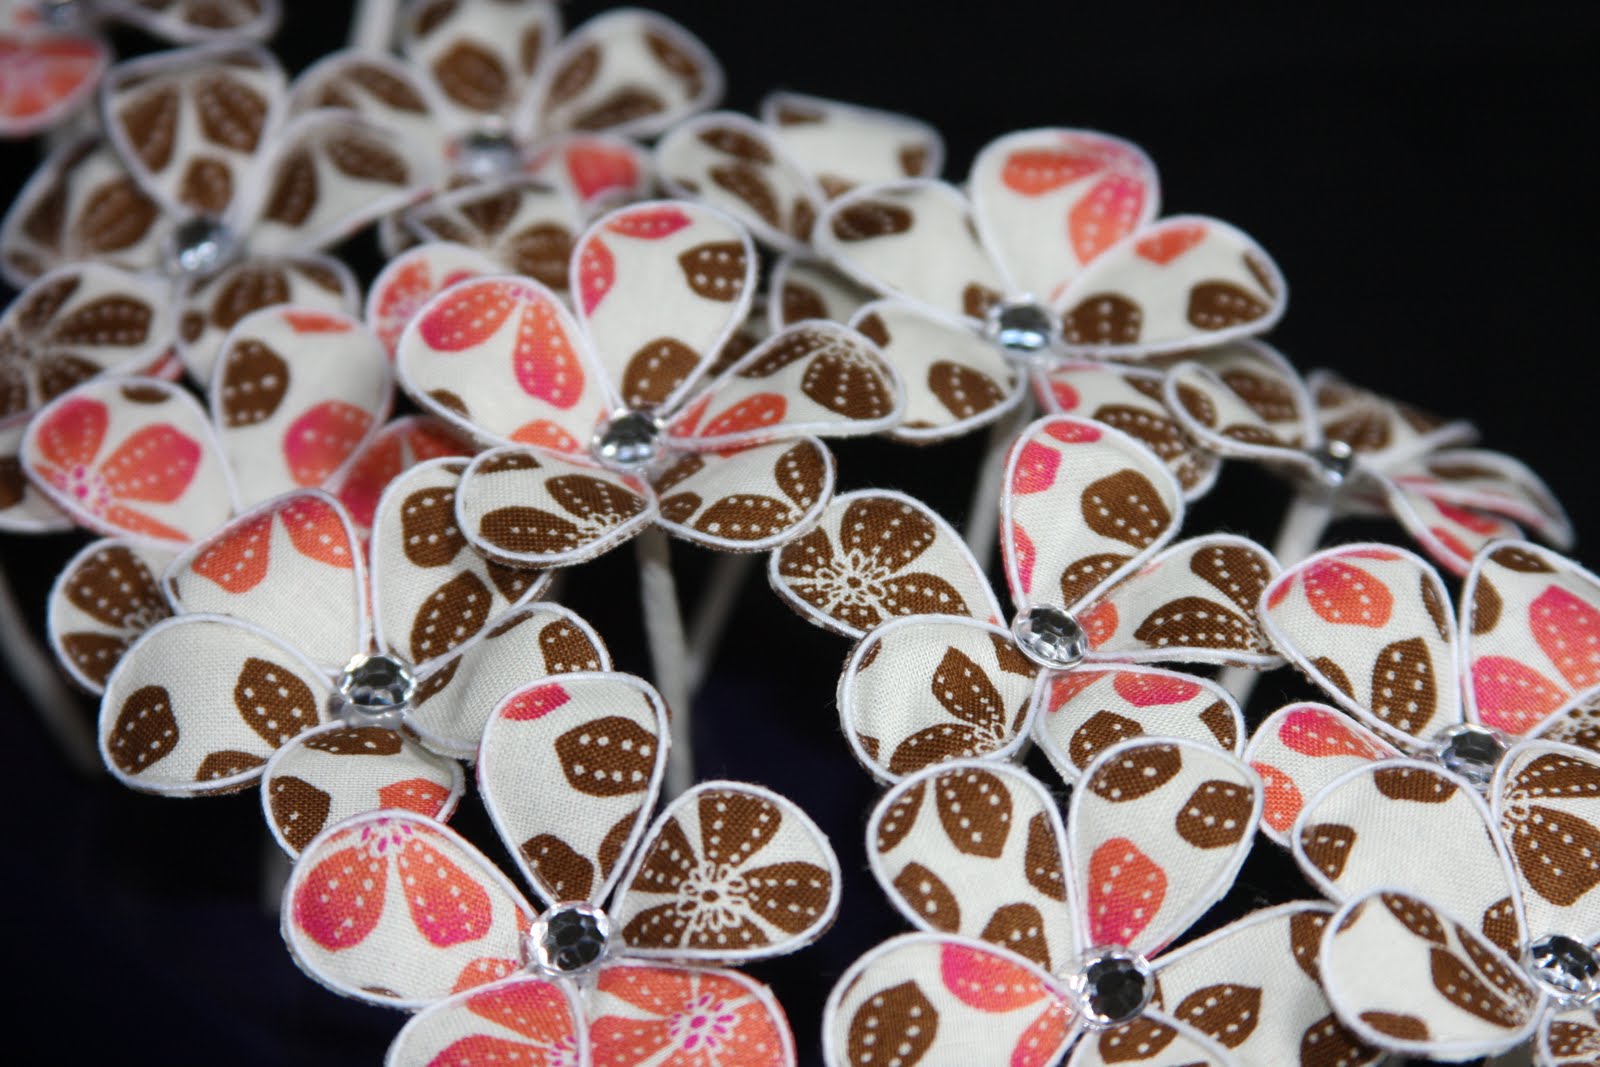
My friend MJ and I had a conversation one day about fabric flowers and asked if I knew how to make them.  I told her I didn't so I went to the world of Google and found an easy tutorial that can be found on the blog Polka Dot Pineapple. With the bridal shower coming up I bought all the supplies I needed to create these flowers especially in Jenna and Wilson's wedding color scheme which are espresso, coral, and ivory (which was hard to find but I totally lucked out). 

I had to individually make each petal and five petals made one plumeria.  I ended up making about 30 plumerias total so you do the math on how many petals I created.  It was time consuming but really easy to make.  This is a great way to use up scraps of material that you may have been hoarding.  Here are a few pictures of the flower making (sorry I don't have pics of each step) and the end result of Jenna and Wilson's shower cake.

The beginning of 150 petals...


Full concentration to get glue and a very thin piece of wire.


I have a yard of material to make a really BIG field of plumerias.


Completed plumerias.


Added some bling to girlyfy them.


 The complete bridal shower towel cake.


My favorite pic of the top tier and I was only playing around with the camera.

Just For Sarah...

As my onesie cupcake gifts are getting better with improvements they have become my go to gift for baby showers if they're being sent out of state.  This particular gift was sent to my husband's aunt on Oahu for baby Sarah.  Sarah is part Japanese so it was only fitting that I made special onesies with Asian printed material cut from my Cricut Expression.  I had gotten the "Pagoda" cartridge last Christmas and it has cherry blossom designs which were perfect for Sarah since it is her room decor theme.  Here are the appliques on the onesies and how they looked after being turned into a "basketful of treats."

"Pagoda & Accent Essentials" Cricut Cartridges


Basketful of Treats

Saturday, September 4, 2010

I Think I Got It....

My second try at making those onesie cupcakes turned out cute but I thought they still needed improvement.  I wasn't particularly happy with the shape of the cupcake after I covered it with the baby washcloth.  Then I had an idea when I had another baby gift to send home to Hawaii, I figured that I should use quilt batting to help give it some shape.  Voila, below is the result of what quilt batting did to improve it for the better.  Think I got perfected now.

Iron On Appliques


Don't they look much better?


Off to Oahu, Hawaii they went.

Second Attempt...

This was my second time making onesie cupcakes and since I was going to attempt to make baby washcloth lolliops, I had the bright idea of using some of the washcloths to cover the tops of the onesies.  For the onesies though, instead of embellishing them with the store bought iron on appliques I made my own fabric appliques from my Cricut Expression. 

Making the washcloth lollipops was my first time, I found a pack of 12 baby girl themed washcloth at a retail department store.  I actually used lollipop sticks since I had a bunch on hand leftover from my previous failed attempt to make cookie lollipops but that's for another story.  Here are the creations that went to our good friends in Las Vegas.

Onesie's w/fabric appliques cut from the Cricut Expression


Washcloth Lollipops


Basketful of "Treats"


My First Onesie Cupcakes...


A long while ago I was Internet researching on different baby gift items to create on your own.  One of the cute and easy gifts I found were onesie cupcakes.  They were just plain colored baby onesies rolled up decorated with little embellishments and stuck into a muffin paper cup thing.  They looked simple enough to make and I figured I could do that myself. 

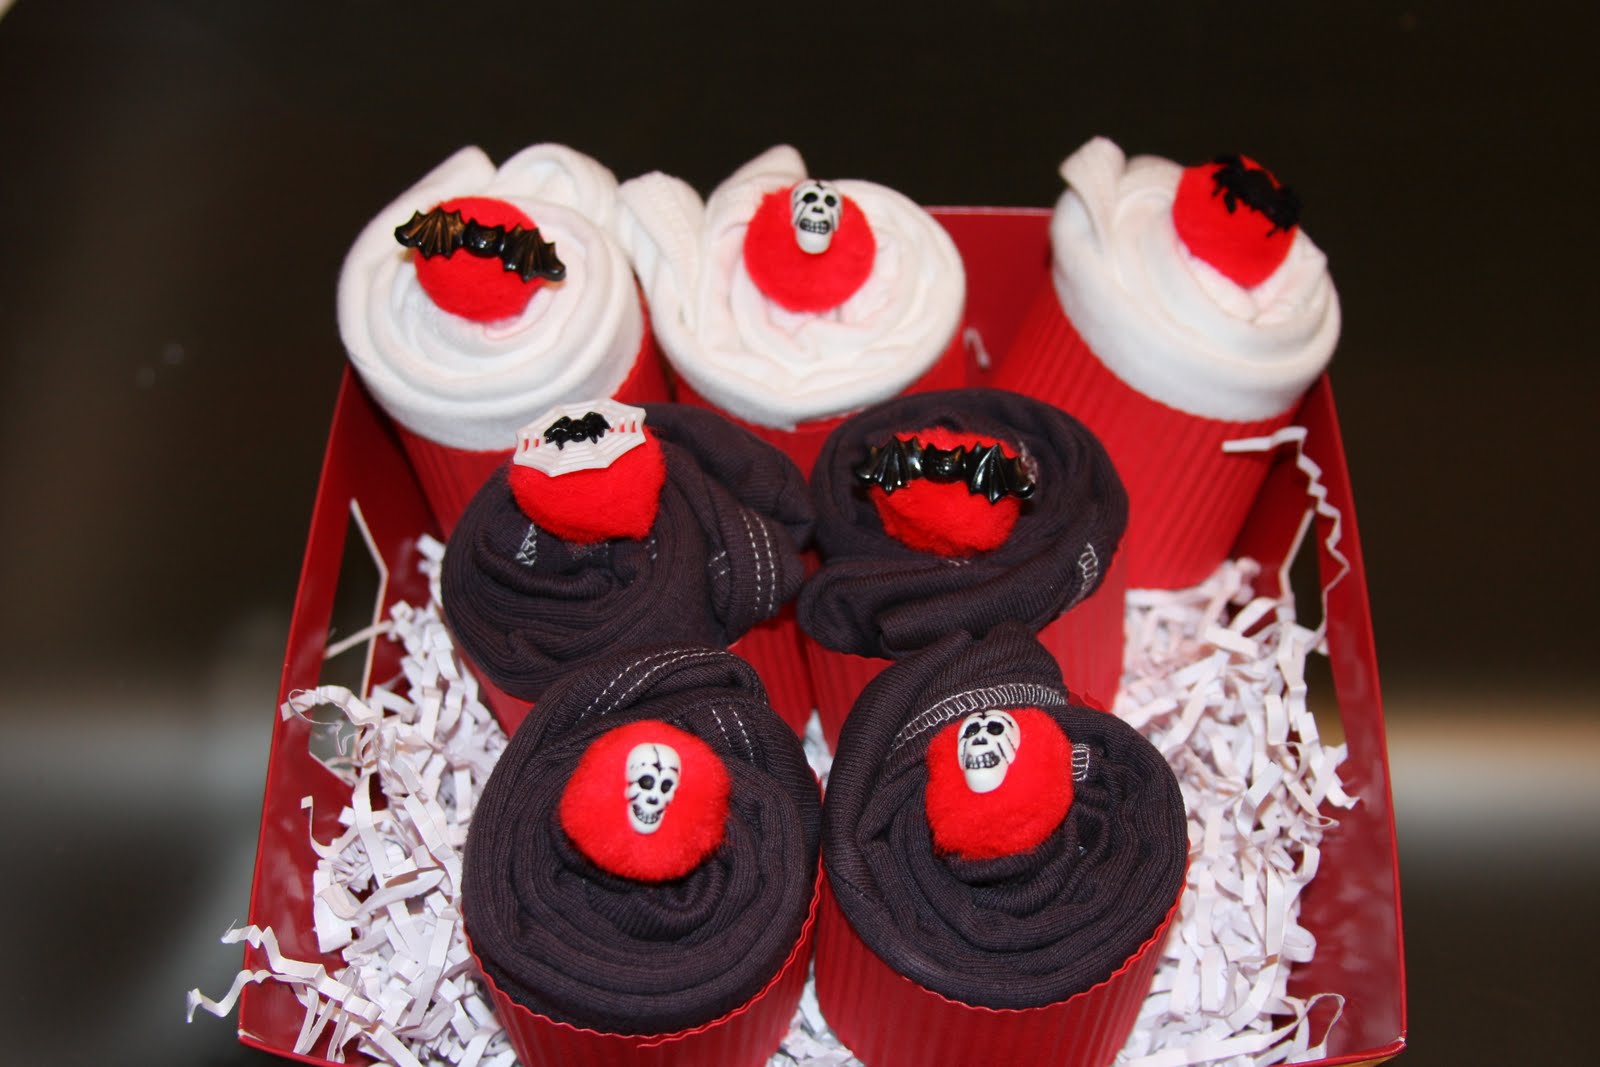
Since I had a baby shower coming up, the mother and father had a very special and specific request on what color clothing they preferred for their baby.  They had a "Nightmare Before Christmas" theme and that was out of the normal baby theme.  I found it as a challenge with open arms to create something as close to that theme as possible. 

Thus this was created and an evolution of onesie cupcake gifts were created.  I dyed some onesies and added cute iron on appliques to each of them, turned them into "cupcakes", and added little embellishments.

"That's How I Roll" & "eat, sleep, poop, cry"


"My Dad Rocks" & "My Mom Rocks"


"So Fresh & So Clean", "Born to Rock", & "AB/CD"


Cupcake Creation


All Packaged & Ready to go