Thursday, March 17, 2011

DIY Nail Polish

I subscribe to the craft website Craft Gossip via Facebook and they post all kinds of daily craft projects done by other crafters. One craft project that caught my eye recently was DIY Nail Polish. The site featured for that project was The Lifestyle Lounge.

The Lifestyle Lounge featured two how-to's but I chose to try out the first option which seemed the easiest to do. After getting my supplies I set out to try my little experiment out earlier today.

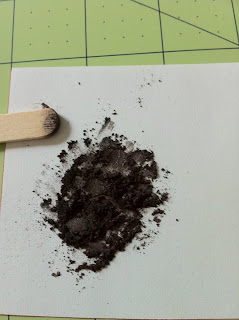
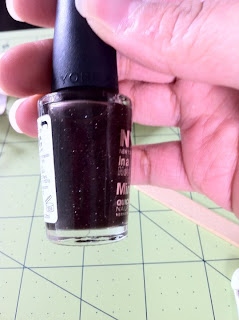
Here's the supply list and directions from The Lifestyle Lounge.  I just got a cheap $1 eyeshadow quad and a $2 bottle of clear polish from Target since I didn't want spend too much on this and not have it work.  This actually did work with cheap supplies and I can't wait to make more.  The bottle of DIY nail polish in the end cost me about $3....not too shabby ;o).

HOMEMADE NAIL POLISH
Materials Required:
Clear Nail Polish
Colored Eye Shadow/ Pigment Makeup
 Nail Polish Remover
Fine Glitter Dust (optional)
Small Funnel
Scrap of Paper
Plastic Baggie


Procedure:
Open up the bottle of clear nail polish and place the funnel end into the bottle.

Block the hole of the funnel by placing a small scrap of paper at the bottom.


Place some eye shadow in a sealed plastic bag.

Gently press the eye shadow and crush it till you get a lump-free, powdery consistency.


Transfer the powdered eye shadow or pigment makeup into the funnel.

If you desire, you can add a very small amount of fine glitter to the funnel mixture.

Carefully mix the fine glitter and eye shadow/ pigment makeup before you remove the scrap of paper.


Remove the scrap of paper and allow the mixture to enter the bottle.

Remove the funnel from the bottle and replace the cap on the clear nail polish.

Shake the bottle well for about 2 minutes.

You can add more eye shadow/ pigment makeup or glitter in case the resultant color is not up to your liking.

In case your nail polish gets thick or lumpy, add a few drops of nail polish remover and shake for one minute to thin the nail polish.

Monday, March 14, 2011

Paella

Here's one of my very belated recipes from my past menu plans.  I've had this cookbook called "Ethnic Foods of Hawaii" written by the well known Hawaii author Ann Kondo Corum for years but never really used it much.  This cookbook showcases recipes from Hawaiian, Chinese, Japanese, Okinawan, Portuguese, Puerto Rican, Korean, Filipino, Samoan, Thai, and Vietnamese ethnicities.  Since I was experimenting with the menu plan wanting to try out new recipes I figure I give this a try. 

One recipe I wanted to try was Paella.  I've eaten it before and I love all the seafood that's in it.  I never tried it since it always seemed too difficult to make.  Since I've been making mushroom risotto lately I figure this pretty much along the same lines. 

This recipe called for minced clams and I had to omit it since my lil booger might be allergic to it.  Nonetheless, in the end once this had been done being made it turned out really good.  Hubby and the lil booger gave the seal of approval and I get to make this again some other time.

Here's the recipe and a picture sample.

PAELLA
Ingredients:
1 lb. boneless chicken breasts or thighs, cubed
1 lb. lean pork or beef, cubed
1/4 cup olive oil
1/2 lb. scallops
1/2 lb. shrimp, cleaned and deveined
1 tomato, chopped
2 cloves garlic, crushed
2 cups rice, washed
1 can (7 oz.) minced clams
1 pkg. frozen artichoke hearts (I couldn't find packaged artichoke hearts so I used 1 canned hearts)
1 pkg. frozen peas
2 tsp. salt
1/4 tsp saffron (can substitute achiote oil for color) (*I used achiote oil since I couldn't find saffron*)
3-3 1/2 cups boiling chicken broth
pimiento, cut into strips
cilantro, chopped

Directions:
Heat oil in a large skillet or Dutch oven or paella pan.  Add chicken and pork and saute until golden brown.  Cover and simmer 10-15 minutes.  Stir in tomato, garlic, rice, clams (including liquid), vegetables, salt, and saffron.  Add boiling chicken broth.  Add scallops and shrimp.  Cook, uncovered over medium heat (or bake at 350 degrees for 10-15 minutes or until liquid is absorbed.  Garnish with pimiento and cilantro before serving.

Sunday, March 13, 2011

Making Malasadas...

Last Tuesday was Fat Tuesday and in Hawaii it's celebrated at Malasada Day.  So to celebrate in spirit I wanted to make our very own maladadas for dessert.  A malasada is a egg sized Portuguese fried doughnut coated into sugar.  I was too lazy to make it the traditional way and wait for the yeast to rise so I did the next best and easiest thing....fried up some canned biscuits. 

I haven't done this in years either and I usually just buy canned Pillsbury buttermilk biscuits, fry them in oil and coat them in sugar.  Instead buying a brand name can of biscuits, I bought the Albertson's generic brand and tried the home style biscuit version.  The buttermilk biscuits tend to have a salty after taste so I tried the home style in hopes that it makes a difference.  I had my lil booger help me out and pop open the biscuit cans, to my surprise the cans that I opened up were the ones that POPPED and made me jump.  His cans had to be forced open and didn't get to scare him like I hoped they would LOL.  Yeah, I know bad mommy wanting to scare her child ;)-

I made a sugar and cinnamon mixture instead of just the normal sugar.  Once the first batch was done cooking, coated in sugar, and cooled off it was time for a taste test.  The home style flavored biscuits made a BIG difference in flavor.  They tasted better than using buttermilk and didn't have that after taste.  Also, coating in sugar and cinnamon made the malasada taste even better.  So much that I had to close the container and walk away LOL.

Here's what our little malasada party looked like.

Friday, March 4, 2011

Food Adventure: Noho's Hawaiian Cafe

So I'm pretty new to the site Yelp. I've been only using it to find restaurants and utilizing that check in feature to places I've been. The other day I received an email from Yelp about 808 restaurants in the 503. I know there's a few Hawaii eateries around in the Portland Metro area but I usually frequent the same two places, namely L & L Hawaiian BBQ and Kauai Island Grill.

When I moved to Oregon nearly 11 years ago the first local eatery I heard of was Noho's Hawaiian Cafe. Since my boyfriend now husband moved to Oregon before I did, he got the opportunity to try that place first and said it was pretty good but pricey. So when I finally moved to Oregon I never got to try out the place till just recently. The only reason it took me so long to try the place is because of the location which is 20 miles from we live and I really don't venture out to Portland much either.

Anywhoo, about the email.  It had Noho's as one of the "must" local food places to eat at. This now intrigued me more to finally go there any try it, so yesterday my hubby decided to finally take me there.  It's a nice small place and we are greeted by the waitress who knew right off the bat was a local girl from Hawaii. We went in the late afternoon so we pretty much had the place to ourselves. 

We ordered the Blalah sized ribs and teri beef to share between my hubby and I and that buggah was HUGE! We later found out that the cook noticed that we were locals from HI and hooked us up. We even got a small bowl of shoyu chicken and rice for our son for free!

The only disappointment was the mac salad. The typical plate lunch is two scoops rice, mac salad, and entree....the mac salad helps make the plate lunch ONO. The consistency of the mayo was watery and the taste was lackluster. I know great mac salad when I've had some and sorry to say this didn't make the grade for me.

That was the only negative thing I had about their food.  I must add though their staff was really nice.  Our waitress came and talk story with us and we even got to meet the owner Noho himself.  He sat down with us and chatted with us for a while as well.  I was always under the impression the owner of Noho's was just a mainland person trying to bring Hawaii local food flavor to the mainland.  My hubby and I were surprised to find out that he's a local boy from Niu Valley and he still get his pidgin accent after living in Oregon for the past 15+ years.  He was a great guy to come talk story with us out of his busy schedule.

On my Yelp review I gave them 4 out of 5 stars....1 star short for their mac salad.  I'd still go again though and try their other items.  Here's  a picture of what our meal looked like.  We didn't get to finish it all, it was that HUGE....enough for our dinner that night.


Tuesday, March 1, 2011

Meal Plan Recipes

So I know I'm totally behind in posting some of my last meal plan recipes.  I honestly can't really remember when I made those meals but I did take some pictures of them.  I will just post those recipes with their pics and they won't be attached to meal plan like how I used to post them. 

So be on the lookout for some new recipes ;o)

Thrifty Tip

I found this book at Urban Outfitters at a mall in Denver when I was visiting my brother called "The Big-Ass Book of Crafts" by Mark Montano.  I've seen him featured on a tv show called "She's Crafty" on the ION channel and he's also on TLC's "While You Were Out" show.

Me being a craftaholic I was really curious on what I could find in this book but I wasn't about the shell out $20 + Denver sales tax. I figured I can find it cheaper later at Barnes & Noble or something which I did for a good price.  However, I checked and see if my local library had in stock so I can look through it and see if it was really worth me buying.  I put in a request to reserve my copy and it was ready for pick up a week later.  I was really excited to go through the book but I was kind of disappointed since most of the stuff wasn't really my taste and my hubby wouldn't go for most of it being decorated in our home.

I did though come across this one idea that caught my eye and it was how to make homemade dryer sheets.  It never really occurred to me that dryer sheets are really just fabric softener, like Downey, dried onto a small piece of fabric.  Same stuff you put into the washer but in a solid form.  So to help save money you can make your very own dryer sheets with old scraps of fabric and a bottle of liquid softener.  This is even better for those you have loads and loads done every week and are on a very tight budget.

Here's all you need:

  • 1 yard of cotton fabric, any pattern
  • Pinking shears
  • Spray bottle
  • 1 bottle of fabric softener, any brand
    • if you use concentrated softenter, just mix one part softener and one part water.
Optional: Sewing machine, with zigzag stitch capability.  Sew a zigzag stitch around the fabric pieces to prevent fraying and to make them look pretty.

Directions:
  • Cut your cotton fabric inot 8" x 8" squares
  • Fill your spray bottle with fabric softener.
  • When you're ready to do a load of laundry, spray a cotton square six to eight times, and toss it in the dryer.
**Wash your squares every once in a while to remove buildup of softener.  With a little care, these dryer sheets should last for years.**