Tuesday, March 8, 2016

Instant Pot Shoyu Chicken

About a month ago my brother came in from Seattle for a visit be had been curious on how my Instant Pot works since I had been posting about it on Facebook. He was pretty amazed that I could cook a local Hawaii favorite is Shoyu Chicken in less than half the time over the stove. This batch I made in the IP took only 8 minutes since it was a mixture of bone in chicken thighs and drumsticks. I had thought I had grabbed a tray of all bone in thighs at the store but this worked out really well. I later cooked a tray of all bone in thighs for a different dish and found I had to cook it in the IP for 12 minutes. 

So depending on what cut of chicken you are using, you will have to adjust the cooking time. This recipe will be based on what I have done so far. 

Here's the recipe. 


INSTANT POT SHOYU CHICKEN

Ingredients:
1 tray of chicken thighs and drumsticks
1 cup shoyu (Aloha Brand preferred)
1 cup water
1/2 cup brown sugar, packed
Few slices of ginger 
Coconut oil or preference
Chopped green onion
Cornstarch and water for slurry


Directions:

Sautéed chicken thighs and drumsticks in coconut oil and set aside. Deglazed the bits with water, shoyu, added sliced ginger, and brown sugar. Added the chicken, cancel sauté, and hit chicken for 8 minutes. NPR 8 minutes and then QR. I removed chicken, hit sauté to thicken sauce with cornstarch and water and added chopped green onion. Placed chicken back to pot. Enjoy!


Friday, March 4, 2016

Instant Pot Pork Adobo


Made another favorite Filipino dish in the IP the other night called Pork Adobo. Which is pork simmered in vinegar, soy sauce, and garlic. It turned out so yummy! Yummier than when I cook it over the stove top. My own adapted recipe as follows:


INGREDIENTS:
3-4 lb. pork butt or shoulder cut into large cubes
1 cup soy sauce 
1/3 cup apple cider vinegar
1-2 tbsp minced garlic
3-4 bay leaves 
1 tsp black pepper
1 tsp oregano (optional, hubby just likes to add this) 
Coconut oil or your preference

DIRECTIONS: 
Sauté pork with some oil for about 5 minutes. Add remainder of ingredients and mix. Cancel sauté and hit meat adjust time to 25 minutes. Be sure valve is at sealing. Let NPR for 10 minutes and then QR. Serve over hot rice. Enjoy!

**I failed to mention that since I did use a pork butt that was kinda fatty, there was lots of oil after it was done. I just used a slotted spoon to drain the fat upon eating. When I stored the leftovers overnight, I just scraped out the solidified fat in the morning and it was less oily.**

Instant Pot Pork and Peas

Ever since I got my new Instant Pot, I've been on a mission to convert local favorites done over the stovetop. So far they have been a success and it's allowing me to get the wheels turning in my head on how to adapt to the IP. 

I can't tell you how much faster it takes to cook and about the tenderness of the meat in the IP. The faster cooking time is what really helps me when we're shuffling in between multiple activities for the family. 

Sometime last week I managed to cook Filipino pork and peas (guisantes) in the IP. This turned out as another keeper in the IP rotation menu. Here is the recipe as follows. 


PORK AND PEAS (GUISANTES)

Another stove top to IP conversion a success! I made a Filipino dish called Pork Guisantes (Pork and Peas) which is pork in a tomato base sauce with frozen peas and pimientos. I just winged it based on my recent IP practice cooking and it went a little something like this...

Ingredients:
2 lbs chopped pork (I used pork shoulder)
1 can chicken broth
1/2 onion chopped
2 tbsp minced garlic 
1-12oz can tomato paste 
1 bag frozen sweet peas
2 small jars diced pimientos
1/3 cup Patis (fish sauce)
3-4 bay leaves (I didn't out any since I didn't realize I was out of them)
Salt and pepper 

Directions:
Sauté pork, onions, and garlic for about 5 minutes. Add chicken broth, tomato paste, and patis. Stir to incorporate. Cancel sauté and hit meat. Adjust time to 7 minutes. NPR for 10 min, then QR. Remove lid. Add frozen peas, pimientos, and S&P to season. Stir. 

Now for this part you could let it simmer on sauté at low temp to let the frozen peas to cook through OR pressure cook for 1 minute. I chose the latter just to experiment since this was my first time make this particular dish in the IP. I placed the lid back on and set it for 1 minute on manual. Then did about 8 min NPR and QR. It ended up working out perfectly! Season more if you like to your preference and enjoy over hot rice. MANGAN TAYON (Let's Eat!)!


Wednesday, February 3, 2016

Spaghetti Squash in the Instant Pot

Have you ever tried cooking a spaghetti squash? The standard way is to bake it in the oven or steam it in the microwave.  I only recently discovered spaghetti squash a few months ago and fell in love with it as a rice and noodle replacement. 

Since I had never cooked one before I had to look it up on Pinterest on the best way to do so. I found that the best way to yield longer "noodles" was to slice the squash into about 2-inch slices rather than cutting in half horizontally prior to baking.  Although this was a much better method, it was pretty scary to cut through the tough shell without cutting any fingertips off. Thankfully there were no casualties for myself. 

Now that I have an Instant Pot, I discovered that I could cook a spaghetti squash whole in it. SAY WHAT?! I just had to test it out and worked like a charm. The shell pretty much slid off like a glove. I'm totally now making my squash in the IP. The best part is not having to cut into the squash before hand. 

Here's the easiest recipe ever ;). 

SPAGHETTI SQUASH

Ingredients:
1 whole spaghetti squash (be sure to use one that will fit your pot insert)
1 cup water

Directions:
Add 1 cup water into instant pot. Place trivet into pot and add squash. Close kid, move valve to seal, and press manual button and adjust time to 15-20 minutes depending on size of squash. Do a quick release when done and check for doneness of squash. Cook few minutes longer if middle isn't cooked through. Peel shell, remove seeds, and shred squash. 


Saturday, January 2, 2016

My Christmas Gift

For this past Christmas hubby asked me what I wanted. I thought and thought about it and decided in between an Instant Pot electric pressure cooker or a TRX workout system (well the cheaper but comparable WOSS system) and a high density foam roller. Hubby had asked me this question before Black Friday rolled up and after much thought I decided on an Instant Pot after hearing rave reviews from a few friends who have one.

We already have a stove top pressure cooker but I'm always afraid to use it for fear of it exploding like how in the movie Radio Flyer. We also have a crockpot which I use a lot, but with getting an Instant Pot I can eliminate both gadgets and just have one to do the same work. Plus it's electronic and all I have to do press a few buttons and it does the magic. 

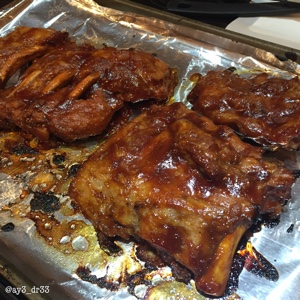
The first meal I ended up cooking in it was a rack of St Louis baby back ribs and it only took 30 minutes to cook! That is the actual cooking time after the pot has come to pressure. It took maybe about 15-20 minutes for the pot to pressurize, then the actual magic started. 

Since this was my very first thing to make in the IP (I will be using this abbreviation to refer to the Instant Pot frequently) I was nervous as heck and didn't want to screw it up. Especially since my hubby was skeptical in getting it for me. I went to the university of YouTube to find an easy enough recipe to follow and I found this recipe by Great Chow and I had all the ingredients on hand. 

After this was done cooking, it literally did fall off the bone. The meat was so tender and flavorful after I did the BBQ sauce glaze in the oven. The only thing I'd change for next time is to use less apple cider vinegar. Otherwise, this was better than when I make it in the oven. 

Here is the link to Great Chow's website for the recipe. Really easy to follow and delicious. 


Banana Mochi Bread

This type of banana bread has become s family favorite over the past few years. It's unlike your regular banana bread recipe since it calls for mochiko flour (sweet rice flour) and it turns out a little more dense because it has almost a mochi like consistency with a perfect amount of sweetness. I found this particular recipe a few years ago on Just a Pinch while Googling for a banana bread recipe. This one intrigued me because of the use of mochiko flour. I'm glad I chose it since it's become a favorite of my boys. So much that my oldest asks me to buy bananas with the intention of eating them but secretly doesn't just so I can make banana mochi bread. Depending on my mood I'll make a batch into loaves, in a cake pan, or as muffins. 
Here is the yummy recipe that I hope you'll enjoy!

BANANA MOCHI BREAD

Ingredients:
1 box (16 oz.) mochiko flour 
1 cup Bisquick
4 tsp. baking soda
1 tsp. salt
2 cup sugar
1 1/2 cup oil
3 tsp vanilla extract 
5 eggs
3 cups very ripe, mashed bananas
1 cup walnuts or macadamia nuts, chopped. (I omit this everytime since certain little people don't like nuts)

Directions:

Combine first six ingredients in a large mixing bowl.  Separately mix oil and vanilla and add to dry ingredients.  Add eggs and mix together until batter is well blended.  Stir in bananas and nuts.  Pour into 4 greased loaf pans (8 1/2 x 4 1/2 inches).  Let batter sit for about 5 minutes before putting it in the oven.  Bake at 350 degrees for 1 hour, do a toothpick test, if it comes out clean, it is done.  Remove from oven onto a wire rack to cool.

*To bake in a 9x13 baking pan, bake for 1 hour.  To bake into muffins, fill muffin tin with cupcake liners, fill tin 3/4 full, and bake for 20 minutes or till brown. Still do a toothpick test to check if it's done. 

Happy New Year 2016!!

Another year has gone by and I always tell myself to keep this blog more active but I don't.  I laugh that the one and only blog post of 2015 was a recipe for kim chee.  

Some good has come out of my dormant blog though. A foodie page on Facebook called Ono Kine Recipes has been sharing a whole bunch of recipes I've posted in past. Mostly it has been the local Hawaiian recipes that have gained exposure on Facebook via Ono Kine Recipes. When a few of my friends contacted me of my blogged recipes being shared, I got excited and started "fan-girling" 😆😊. This was a Facebook page that I was already saving and sharing posts from and now here's my very own blog recipes being shared. It's pretty cool I must say 😉👍🏼. 

On another note regarding everything else going on in my "semi chaotic life". Things have been going well and super busy. Hubby is ever so busy in all things football, big kid is in the second grade and just started taking up Brazillian Jiu-Jitsu, little kid is turning 4 in two weeks and continuing on with speech therapy school, and the fur child is getting old with congestive heart failure and taking a bunch of meds to help prolong his time with us. 

That right there is a HUGE amount of info to delve into since there's been basically LOTS of life info missing from the last time I was actively blogging. So to start off with what I hope is a more active blog this year is my first recipe of 2016 to share in another post which I will post immediately after this post...I promise 😝.  

So here's to a New Year to everyone! We've got 366 days to make the best of it...well 365 now that it's past midnight as of right now for me 😆. Stay tuned for the first recipe 😃.