Wassup stranger?! I know I've taken another hiatus since I last posted way back in September. YIKES!
Most of you in my Facebook world know the one BIG reason for that added with the lil booger going to preschool, hubby coaching football, and then the holidays rolled on in soon after. I've been though pretty active in using the Instagram app and posting all kinds of pictures especially recipes I've found off of Pinterest that turned out well.
I will get back into posting recipes when I survive through the lil manapua's first birthday party we're planning. Which by the way I hope to take enough pictures of since I'm doing a whole lot of DIY decor and such.
However, I just may be able to squeeze in a recipe or two in the meantime. Just be on the lookout ;o).
Tuesday, January 8, 2013


Wednesday, September 5, 2012
Today Marked A...
BIG day for us.
The lil booger started his first day of PRESCHOOL!!
He already had his orientation two weeks ago, met his teacher, and saw his classroom. We've been going through certain rules at home that he should follow such as raising his hand when he needs to ask a question, no sucking his thumb (trying to break him out of this habit), no putting his hands in other peoples faces, and most of all if he has to fart go to the bathroom to name a few.
On the way to school I drill him on the rules again and he tells me that he doesn't want me to leave him with such sadness in his voice that made me tear up a bit :o(. Mind you that he only goes to school for two and a half hours M-F, he's only gone for pretty much the same length of time I put him into the daycare room at the gym.
Guess its the realization that he's really growing up and "on his own" after being home with me for the past four years. *SIGH* Once we got to school though he got excited and couldn't wait to get out of the car. We were a bit early and the doors were still locked, but that didn't stop him from pressing his face against the glass door to take a peek inside.
Once inside he quickly hung up his backpack, found his name tag, and went straight to the train set he played with the other week. He paid no attention to me and wasn't interested in giving me a hug and kiss goodbye. :o(. That did kind of disappoint me a bit, but I let him on his way.
My not so lil booger is growing up, next thing you'll know he's off to college studying to be a "dinosaur doctor".
Friday, August 31, 2012
Frugal Friday: Homemade Foaming Hand Soap
Who here loves Bath & Body Works Foaming Hand Soap in their yummy smelling scents?
*Ohh Ohh raises both hands here!!*
They get quite spendy even if you buy them on sale. I had no qualms before to snatch those babies up during a sale to stock up when I used to work and make my own money. Now that we've been a single income family for the past four years or so getting those BBW soaps were a once a great blue moon buy. Then I started to use generic Target foaming hand soap to refill the BBW bottles until I of course discovered Pinterest.
I stumbled upon several pins on how to make your own foaming hand soap. I honestly cannot tell you who I saw the pin from since it's been months since I first tried this out, but if you searched DIY foaming hand soap several pins will come up.
The one I found though simply just used an inch of baby washing soap and filled the rest of the bottle with water. You should actually leave about half an inch or so from the top of the bottle since when you put the pump back in it will overflow, then just tip side to side and up and down (DON'T SHAKE) to mix.
I had some baby washing soap from my baby shower that I ended not being able to use since the baby was "lucky" to have sensitive skin like me. So rather than waste those bottles of baby wash I put them to use and been using them for our hand soap.
It's been working great for us and in the end is a really cheap way to refill those foaming hand soap bottles. I think when I would buy the generic big bottle refills which ran about $4 and would only refill at the most four empty foaming dispensers. One 15 fluid ounce bottle of baby wash that cost about $4 as well has so far refilled my kitchen and downstairs bathroom dispensers at least a dozen plus times so far and there's still a little over 1/4 left in the baby wash bottle.
I'll be doing this for a long while now and you can even use the other scented baby washes. I had the lavender scented one as well and used that for the upstairs bathroom. My hands almost smells as good as a baby's freshly bathed bottom haha.
I hope that you try this out as well since I highly recommend it. So that's my frugal tip for Frugal Friday.
Everyone enjoy this Aloha Friday and long weekend!
Friday, August 24, 2012
Frugal Friday: Homemade Dryer Sheets Part 2
Last week I posted about making your own homemade dryer sheets using scrap material and spraying in diluted liquid fabric softener on them before tossing into the dryer. I had been using that method for over a year but now have found another method.
I found this similar option on Pinterest via One Good Thing By Jillee where she also made homemade dryer sheets. Instead of the scrap material I currently use, she used old dish rags. Now why didn't I think of that? Rags or even washcloths are more absorbent and would retain the liquid softener longer.
She too soaked the rags in softener, squeezed out the liquid, and let them completely dry then tossed into the dryer. According to her post one "sheet"is good for at least 12 loads of laundry before you need to re-soak them.
So I went out and got me a pack of cheap washcloths from Target. They were having their back to school sale and there was a section of home essentials. I got a pack of eight washcloths for about $3.00. Just to experiment with this new method I only used four washcloths just in case I didn't like the results and I didn't want to waste perfectly good washcloths either.
I took my spray bottle of equal parts of water and liquid fabric softener and sprayed the cloths outside and hung them over our patio chairs till they dried completely. Today I did a load of laundry and used one of the cloths to test them out and it worked AWESOMELY!! My laundry smelled fresh and no static cling either. Looks like I'll be doing this method from now on and I highly recommend it too.
That was my frugal tip for the week and hope you have a great Aloha Friday.
Monday, August 20, 2012
Made By Me Monday: Wrapped Earbuds
I know I'm not the only one who has neatly put their MP3 player earbuds neatly in your pocket or bag and to only take them out later and they're a knotted mess. This not only has happened to me everytime but the worse time was when I accidentally washed my earbuds in my gym jacket and it took me FOREVER to untangle them. See...


So of course while perusing Pinterest I find a DIY on how to prevent your earbuds from tangling by wrapping the cords with embroidery thread. Hmmm....makes sense since it will make the cords thicker and the rubber won't "stick" to each other. The one site that intrigued me was Kiss Me Awake's post that does a friendship bracelet type of weave AND she included a video tutorial! How cool is that?
I had never weaved friendship bracelets before as a kid so I felt a little intimidated trying this one out but after watching the tutorial it actually helped out a lot. I got my supplies from my toy store Joanns and got going a few days ago. Once I got started it got pretty easy to do and started coming out pretty cool. I had hoped to finish the whole thing today but I still have one side of the earbud to finish. These kids kept demanding my attention LOL...well my lil manapua kept running a fever since I think he's starting to teethe and has been super grouchy and only wants mommy.
Go and check out Kiss Me Awake's tutorial on the how to and here's how mines turned out so far.


Friday, August 17, 2012
Frugal Friday: Homemade Dryer Sheets Part 1
This will be a two part post since i missed last week's Frugal Friday post. The first part will be about the current way I've been using homemade dryer sheets for over the past year.
I first learned about this technique after reading the book "Big Ass Book of Crafts" by Mark Montano. In the book it showed that all you needed was some scrap cotton material and a spray bottle of equal parts of liquid fabric softener and water. Then just spray your fabric scrap with the softener and toss into the dryer.
I had been doing that for several months but kept finding that my clothes would have "wet softener stains" and the blue Downy would bleed onto the whites laundry load. So rather than putting in a wet fabric scrap I would spray each scrap and let them dry completely before throwing them into the dryer.
This has working well for us and I haven't had to buy disposable dryer sheets for over a year. There is no static cling and our clothes still smell Downy fresh (I still put some for the laundry rinse cycle).
I did though find another similar way for homemade dryer sheets, but will save that for next week's Frugal Friday. Here's my current how to on the dryer sheets.
Until then Happy Aloha Friday!
HOMEMADE DRYER SHEETS
Supplies:
8x8 sized cotton fabric scrap
Sewing machine and thread
Spray bottle
Liquid fabric softener
Water
Directions:
Zig zag stitch or serge the edges of your scrap material to prevent fraying.
Put equal parts of liquid fabric softener and water into the spray bottle.
Spray mixture onto each side of fabric scrap and let dry completely.
Toss into dryer with your laundry load.


Monday, August 13, 2012
Made By Me Monday: Lei Me
The craft of the week that I made were LEIS! Our good friend's nephew that we've known since he was in fifth grade just graduated from Heald College the other week. So of course the Hawaii tradition is to make leis for the graduate whether they be made with real flowers or artificial items. Since we can't really get the kind of fresh flowers we can get back home in Hawaii, I make do with artificial items. I only had a week to make several leis so I went with a fun fur yarn lei, ribbon lei, and a net stuffed lei.
I'm fortunate enough to have my mom ship me items that I can't get here in Oregon (which is quite often because she LOVES me ;p) and a few months ago when I was on a lei making frenzy she sent me several packages of net tubing for stuffing items to make a lei.
For this particular graduate I knew one of his favorite alcoholic drinks so I bought mini bottles of Maker's Mark Whiskey, several packages of saimin, and bananas. Why the saimin and bananas? Weird combo yah I know. I had originally wanted to stuff the lei with whiskey and travel sized packets of Tylenol or Advil as a joke in case he had a hangover after his graduation party. It seemed a little boring to have just have those two items in the lei. So I asked my hubby what hangover relief items could I put into the lei and he said SAIMIN. Oh DUH why didn't I think of that.
Then a few nights later on Facebook the graduate posted that he was preparing to hydrate the night before his party and I jokingly said to keep the Gatorade handy. So he replied saying that bananas help with easing his tummy (why? I really don't know), so that gave me another idea to opt for the bananas instead of the Tylenol or Advil. So here how this lei turned out.

The second lei I made was a fun fur/fuzzy yarn lei with kukui nuts and shells. This was my first time making this type in particular since I've only done the whole strand of just yarn. I like it a lot so I'll for sure make more of these in the future. Here's how this one turned out.


AND here's the graduate rockin' the leis. CONGRATS JOSH!!

I'm fortunate enough to have my mom ship me items that I can't get here in Oregon (which is quite often because she LOVES me ;p) and a few months ago when I was on a lei making frenzy she sent me several packages of net tubing for stuffing items to make a lei.
For this particular graduate I knew one of his favorite alcoholic drinks so I bought mini bottles of Maker's Mark Whiskey, several packages of saimin, and bananas. Why the saimin and bananas? Weird combo yah I know. I had originally wanted to stuff the lei with whiskey and travel sized packets of Tylenol or Advil as a joke in case he had a hangover after his graduation party. It seemed a little boring to have just have those two items in the lei. So I asked my hubby what hangover relief items could I put into the lei and he said SAIMIN. Oh DUH why didn't I think of that.
Then a few nights later on Facebook the graduate posted that he was preparing to hydrate the night before his party and I jokingly said to keep the Gatorade handy. So he replied saying that bananas help with easing his tummy (why? I really don't know), so that gave me another idea to opt for the bananas instead of the Tylenol or Advil. So here how this lei turned out.

The second lei I made was a fun fur/fuzzy yarn lei with kukui nuts and shells. This was my first time making this type in particular since I've only done the whole strand of just yarn. I like it a lot so I'll for sure make more of these in the future. Here's how this one turned out.

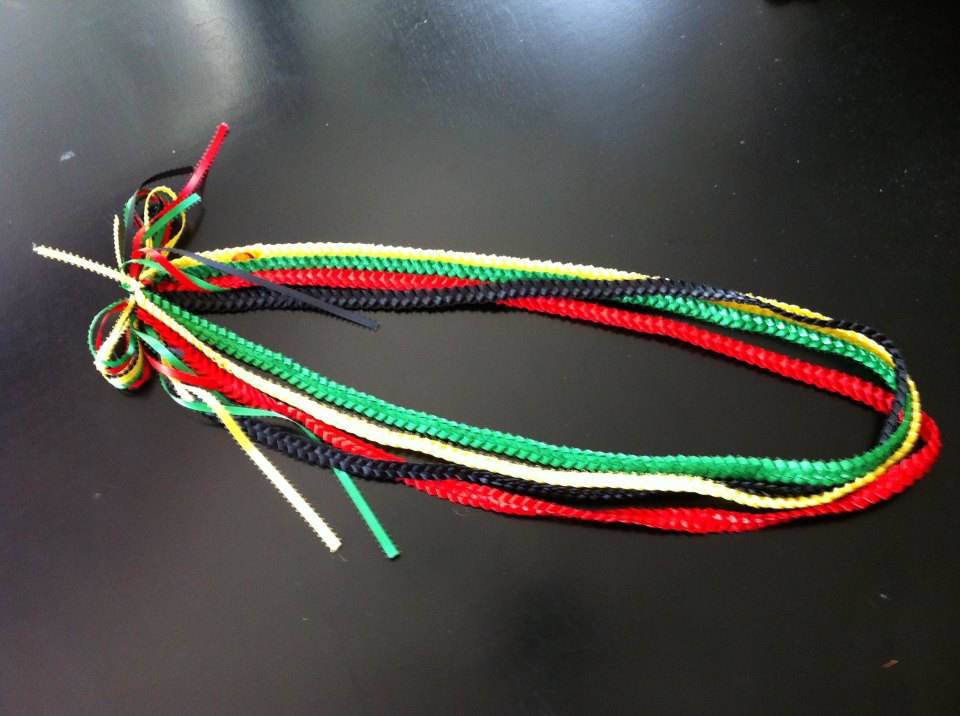
The last lei I made is one I've learned how to do from all the way back in high school some *cough* 15 years or so ago *cough*. This ones so simple and relatively cheap on the materials. I chose to make a four stranded lei of red, yellow, green, and black (Rasta in colors). I could easily make this in several hours but for some reason my two kids demand my attenion LOL. Here's the end result.
AND here's the graduate rockin' the leis. CONGRATS JOSH!!

Subscribe to:
Posts (Atom)